
The shortest route to a cleaner waistband fit
- Wash or rinse new jeans first so you alter the final size, not a pair that will still shrink.
- Keep the total waist reduction modest: about 1 to 1.5 inches (2.5 to 4 cm) is the practical DIY ceiling before the fit starts to shift elsewhere.
- Use back darts for small to medium gaps; use a centre-back adjustment only when the excess is clearly centred.
- Always match thread, needle and topstitching to denim so the repair reads as intentional.
- If the hips, rise or crotch are wrong, a waist alteration alone will not solve the fit.
Check whether the jeans are a good candidate in the first place
Before I touch the waistband, I check whether the jeans already fit where it matters most: the rise, hips and crotch. If those areas are off, pulling in the waist usually creates a worse problem somewhere else, because denim has to travel around the body as a whole, not just close at one point.
Put the jeans on, stand naturally and pinch out the excess at the back waist. Measure that gap while the jeans are worn, then repeat after the jeans have been washed at least once or twice if they are new or stiff. Denim can relax or shrink slightly, and I prefer to alter the final version, not the hopeful one. As a working limit, I keep most DIY waist reductions to about 1 to 1.5 inches (2.5 to 4 cm) total; beyond that, the pockets, yoke and seat start to move enough that the repair stops being simple.
Once the jeans are a sensible candidate, the next decision is which kind of take-in will remove the excess without telegraphing itself from the outside.
Choose the method that matches the size of the gap
The best method depends on where the extra fabric sits. A neat pair of jeans with a small centre-back gap can usually take darts; a wider or uneven gap often needs the reduction split into more than one dart or handled by a tailor who can rebuild the waistband cleanly.
| Method | Best for | What it changes | When I avoid it |
|---|---|---|---|
| Two small back darts | A small gap, roughly under 1 inch total | Mostly the back waist, with minimal effect on the front | When belt loops sit too close to the seam or the gap is wider than one neat fold can hide |
| Four smaller darts | A moderate gap of about 1 to 1.5 inches total | Spreads the shaping across the back so the change looks softer | When the jeans are heavily distressed across the back and extra stitching would be obvious |
| Centre-back waistband reset | A centred gap or a more precise professional finish | Rebalances the waistband and seat more thoroughly | When the front pockets, yoke or seat already sit at their limit |
| Tailor-led rebuild | Expensive denim, thick seams or a larger fit correction | Can preserve the original look better than a rushed DIY repair | When the jeans are inexpensive enough that the alteration costs more than replacing them |
I usually split the reduction evenly unless the body shape is clearly asymmetrical. If one side gaps more, it is better to correct that side by a little more than to force a fake symmetry that the jeans do not need.
Once you know which route fits the problem, the actual sewing becomes much easier to plan.
Take the waist in with back darts
This is the method I reach for most often when the jeans fit well everywhere except the back waistband. Darts let me remove excess fabric without dragging the whole side seam out of place, and they are especially useful when the jeans only need a modest reduction.
What I use
- Seam ripper
- Pins and washable chalk
- Ruler or tape measure
- Denim or jeans needle
- Strong polyester thread
- Iron and pressing cloth
- Tailor’s hammer or a small mallet for thick seams
Read Also: Free Jeans Pattern - Sew Your First Perfect Pair
The sewing sequence
- Put the jeans on and pinch the excess at the back waist, keeping the waistband sitting where you actually wear it.
- Mark the fold with pins or chalk, then take the jeans off and measure the total amount removed.
- Divide the reduction evenly unless the gap sits more to one side. If each dart is very small, place them near the back side seams; if the gap is bigger, split the shaping into two or four darts.
- Turn the jeans inside out and mark the dart lines from the waistband downward. I usually taper each dart so it fades out about 3 to 4 inches (7.5 to 10 cm) below the waist.
- Sew from the waist down to the end of the dart, then backstitch securely at the top.
- Trim the excess only after a test fit, press the darts flat, and check that the seat still falls smoothly.
If the reduction is more than about 1/2 inch (1.25 cm) per dart, I stop treating it as a simple little tuck and start thinking about whether the excess should be shared across more than two darts. That keeps the denim from bunching into a point below the waistband. The outside finish is only half the job, though, because the waistband, loops and patch have to be put back with the same discipline.
Rebuild the waistband, loops and patch so the change disappears
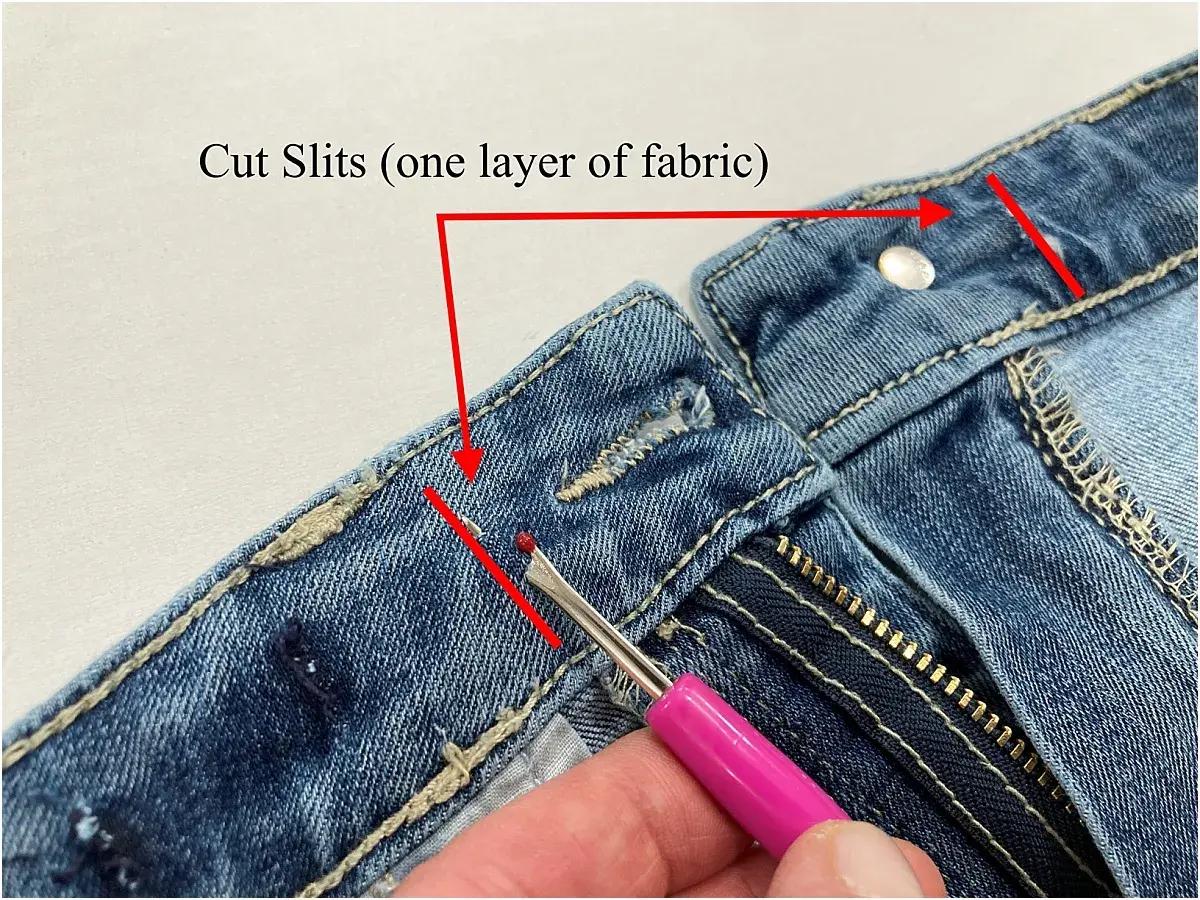
The waistband is what makes the alteration look original. I unpick only the stitches I need at the waistband ends, then free the top of the centre-back belt loop and any brand patch that sits in the way. On many jeans, the yoke seam, which is the angled seam below the waistband that shapes the seat, is where the thickness collects, so I flatten that area before stitching it back together.
Topstitching matters here. Topstitching is the visible row of stitching on the outside of the jeans, and it is part of the structure as much as the finish. Match the thread colour closely, keep the stitch length consistent with the original, and press each seam as you go. If the denim is bulky, I use steam and a tailor’s hammer over a folded cloth to tame the ridge before I close the waistband, because a thick lump at the back is what turns a neat alteration into something you feel every time you sit down.
If the jeans have a leather or paper patch, I either reattach it after sewing or move it back into place once the new seam is secure. That extra minute keeps the pair looking repaired rather than improvised, and it leads straight into the mistakes that usually give the game away.
Avoid the mistakes that make denim look altered
Most bad waist alterations are not failures of sewing; they are failures of judgement. The classic one is removing too much from the centre back and leaving the pockets too close together or the seat too flat. Another is ending the dart too abruptly, which leaves a point or a small bubble below the waist instead of a smooth taper.
- Keep the reduction balanced. If one side gaps more, adjust that side a little more, but do not force perfect symmetry where the body is clearly asymmetrical.
- Use a denim needle and strong thread. Heavy denim needs a setup that can handle thick layers without skipped stitches.
- Press every stage. Denim remembers the iron; skipping pressing is one of the fastest ways to end up with a visible ridge.
- Don’t ignore the front fit. If the waistband closes but the front pocket line pulls or the fly twists, the jeans were not a good candidate for this alteration.
- Be realistic about complex denim. Deep fades, heavy distressing, contrast topstitching and thick seams all raise the difficulty.
When I see those limits, I stop trying to force a perfect DIY answer and think in tailoring terms instead.
When the waistband is the only problem, keep the jeans
When the rest of the jeans already works, a waistband take-in is one of the most satisfying alterations you can do. It can turn a pair that keeps slipping down into something you actually reach for, and it is usually far cheaper than replacing good denim.
If you are dealing with more than a modest gap, or if the hips and rise are also wrong, I would not keep narrowing the waistband in the hope that the fit will magically settle. That is usually how jeans end up looking pinched at the back and awkward at the front. The cleanest result is a small, controlled alteration that sits flat, closes comfortably and disappears into the original construction - exactly what a well-made pair of jeans should do.
