
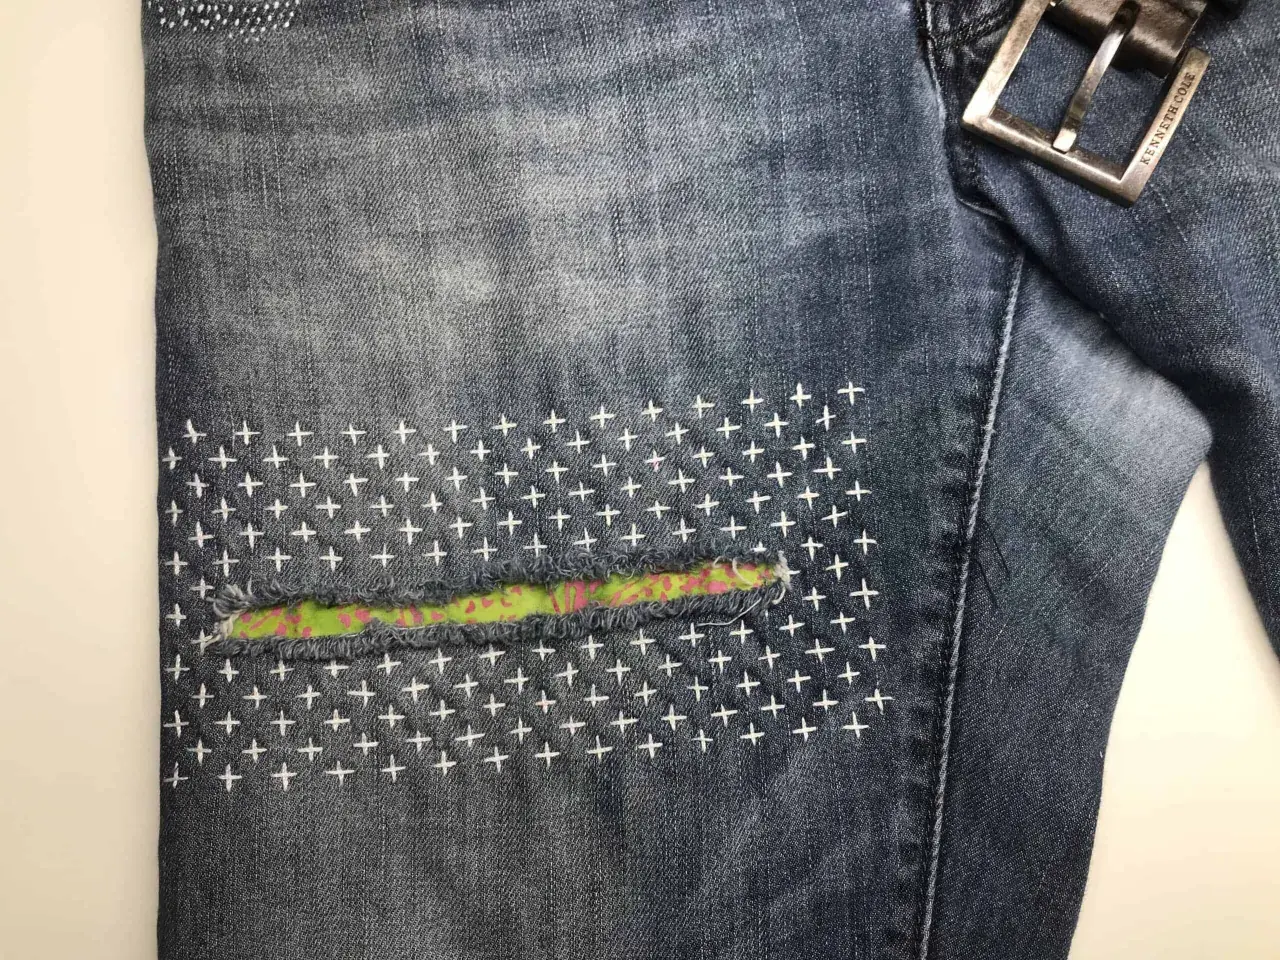
Jean repairs work best when the fix respects both the fabric and the way the garment is worn. Sashiko is useful here because it strengthens worn denim, covers damage cleanly, and leaves the repair looking intentional rather than improvised. In this guide I cover when the method works, which tools matter, how I stitch the patch, and where it stops being the right solution.
What matters before you start
- Sashiko is strongest on denim that is worn thin or lightly torn, not on fabric that has already collapsed.
- A long needle, cotton thread, and a patch that extends at least 5 to 7.5 cm beyond the damage make the biggest difference.
- Relaxed tension matters more than decorative ambition; tight stitches pucker denim and shorten the life of the mend.
- Knees, pocket corners, and outer thighs are easier to repair than a shredded crotch seam.
- In UK shops, thread is usually inexpensive and specialist denim repair typically starts around £25, rising with complexity.
What sashiko brings to jeans
I treat sashiko as reinforcement first and decoration second. The original logic behind the technique is practical: keep useful fabric in service for longer by adding rows of strong hand stitching over vulnerable areas. On denim, that gives you three things at once: structure, coverage, and a visible finish that can look better than a hidden patch when the jeans already have character.
It works especially well when the damage is localised. A knee hole, a frayed thigh, or a pocket corner with repeated abrasion can all be stabilised neatly. What it does not do well is rescue fabric that has become paper-thin across a wide area, or stretch denim that keeps opening because the weave has lost too much stability. In those cases, I usually combine a larger backing patch with dense stitching, or I switch to another repair strategy altogether. That distinction is where the technique becomes genuinely useful rather than merely pretty, and it leads straight into the materials that make the repair hold.
The tools and fabrics that make the stitch hold
You do not need a drawer full of specialist gear to start, but the right basics save time and frustration. In UK shops, sashiko thread often sits in the roughly £2 to £7 range per skein, and needles are commonly around £3 to £5 a pack. That is low enough that the real investment is usually your time, not your budget.
| Item | What I use | Why it matters |
|---|---|---|
| Thread | 100% cotton sashiko thread, or a strong cotton alternative | It is thicker and more abrasion-resistant than ordinary sewing thread, so it survives repeated wear. |
| Needle | Long sashiko needle with a large eye | The long shaft lets me load several stitches before pulling through, which makes the rhythm smoother. |
| Patch fabric | Firm cotton, denim scraps, or tightly woven workwear fabric | The backing needs enough structure to support the worn denim without adding too much bulk. |
| Marking tool | Tailor’s chalk, washable pen, or soap sliver | Simple lines keep the stitching even and stop the pattern from drifting. |
| Scissors and thimble | Small sharp scissors, plus a thimble if the denim is heavy | Clean trimming and hand protection matter more once you start working through multiple layers. |
I avoid stretchy patch fabric unless I have no other choice. Denim blended with elastane can still be repaired, but a stretchy backer tends to move under tension and invites the tear to return. If I am mending a hard-wearing pair, I prefer cotton-on-cotton stability. That choice makes the sewing easier, and it also sets up the repair process itself.
How I mend jeans step by step
When I repair jeans by hand, I try to keep the sequence simple. The mistake many people make is trying to stitch beautifully before the garment has been stabilised. I want the fabric flat, the weak area supported, and the repair line planned before the first stitch goes in.
1. Assess the damage first
I check whether the hole is still spreading, whether the denim around it feels thin, and whether the seam itself is involved. If the damaged zone is larger than a 2 to 3 inch area, I make the patch bigger than that by a clear margin. In metric terms, I usually want at least 5 cm of extra coverage on every side, and more if the fabric around the tear feels fragile.
2. Back the area with a patch
I turn the jeans inside out and place the patch behind the hole so the strongest part of the patch carries the stress. If the tear sits on a visible section like the thigh or knee, I keep the patch neat but not tiny. A patch that is too small is a false economy; it looks tidy for a week, then the tear reappears around the edges.
3. Stitch with relaxed, even tension
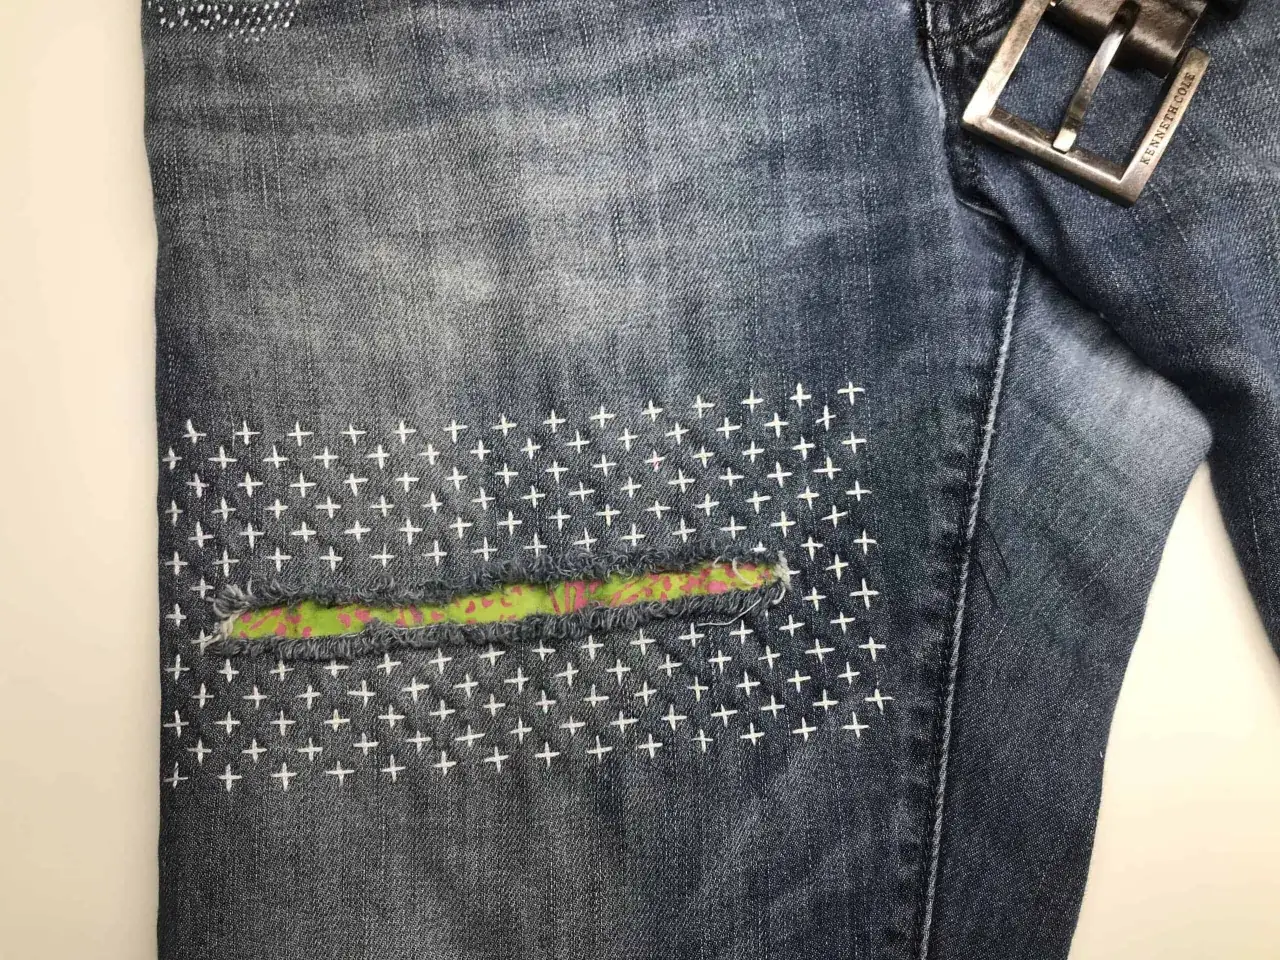
Once the patch is secure, I stitch through both layers with a running stitch. The point is not to squeeze the denim together. I keep the rows even, leave the fabric relaxed, and let the pattern do the work. If I am using a geometric design, I start with long straight lines, because they are easier to keep balanced across the weave of the denim.
4. Lock the ends cleanly
I do not rely on bulky knots where they will rub against the skin. Instead, I secure the thread discreetly on the inside, then trim the ends neatly. On heavy jeans, this small detail matters more than people expect. A tidy finish reduces bulk, which reduces friction, which helps the repair last longer.
Read Also: Slacks vs Dress Pants - The Real Differences Explained
5. Press and test the repair
After sewing, I press the area gently from the inside if the fabric allows it, then flex the jeans by hand. If the stitch line puckers, I loosen the tension on the next section rather than forcing the issue. A good mend should move with the garment, not freeze it into place. That is also why placement and pattern choice matter so much, which is where I go next.
Where the method works best on jeans
Not every area of jeans behaves the same way. A repair that looks elegant on a knee can feel bulky and awkward on a crotch seam. I decide placement by asking one simple question: where does this garment take the most friction, and how much structure is left around that point?
| Jeans area | How well sashiko works | My approach |
|---|---|---|
| Knees | Excellent | I use broad rows or grids because the area is naturally visible and the fabric needs spread-out reinforcement. |
| Thighs | Very good | I back the whole worn zone and keep the pattern aligned with the grain so the patch feels integrated. |
| Back pocket corners | Very good | I use smaller geometric sections or short reinforcing lines where the pocket rubs most. |
| Inner thigh and crotch | Possible, but demanding | I keep the patch larger and denser, because this area sees constant strain and a decorative-only mend will fail early. |
| Hems and cuffs | Good for reinforcement | I stitch before the edge frays too far, which is easier than trying to rescue a hem that has already split open. |
For pattern choice, I favour simple geometry over fussy motifs on workhorse jeans. Parallel rows, crosshatching, and loose grids are easier to control and usually wear better than complex shapes. The best design is the one that follows the stress path of the garment. If the stitch line supports the movement of the denim, the repair looks intentional instead of ornamental, and that distinction becomes obvious once the first mistakes are avoided.
Common mistakes that make the mend fail
- Using a patch that is too small. The tear keeps working against the edge, so the repair breaks down around the perimeter.
- Pulling the thread too tight. Denim puckers, the surface distorts, and the stitching wears faster under tension.
- Choosing weak thread. Ordinary fine sewing thread can look neat at first but abrades quickly on a high-friction area.
- Ignoring the fabric around the hole. If the surrounding area is thin, the original damage is only part of the problem.
- Trying to force sashiko onto very stretchy denim without support. Elastane-heavy jeans need more stabilisation, not less.
I see the same error repeatedly: people treat the visible stitching as the repair and forget that the backing is doing most of the structural work. That is why I think of sashiko as a system, not just a pattern. Once that is clear, the real question becomes whether this is the right repair method at all, or whether another option would serve the jeans better.
Repair, reinforce, or hand it to a specialist
Sometimes the smartest choice is not the prettiest one. If the jeans are cheap fast-fashion denim with wide damage across the seat or inner thigh, I would not spend a full evening hand-stitching unless the pair has personal value. If the denim is good quality, fitted well, and already broken in, sashiko becomes far easier to justify. In the UK, I found specialist denim repairs starting at around £25, with more involved work climbing to about £60 or more per hole, depending on the damage and the finish.
| Option | Best for | Strengths | Trade-offs | Typical UK cost |
|---|---|---|---|---|
| Hand sashiko | Visible reinforcement on knees, thighs, and pocket areas | Strong, expressive, low material cost | Time-intensive and less suitable for heavily shredded fabric | About £5 to £15 in materials if you already have scraps |
| Hand darning | Smaller holes and thin spots | Flexible, discreet if worked in matching thread | Less decorative; can feel denser on denim | Similar material cost to sashiko |
| Machine patch | Fast fixes on casual jeans | Quick and practical | Bulkier finish, less character, less hand-controlled precision | Low if you sew it yourself |
| Professional repair | Expensive denim, complex tears, or pieces you want finished neatly | Consistent result, less personal labour | Costs more than DIY and may take days or weeks | Commonly from about £25, often higher for complex jobs |
If the tear sits in a high-stress zone and the denim has already started to fail beyond the immediate hole, I often recommend a larger patch and denser stitching, or a specialist service if the jeans are worth preserving properly. That decision usually comes down to how the garment will be worn next, which is why aftercare matters just as much as the sewing itself.
How to keep the repair in the rotation
Once the jeans are fixed, I want the repair to survive real life, not just a photo. The simplest way to help that happen is to reduce heat, friction, and aggressive washing. I wash repaired denim inside out, keep the temperature low, and line dry whenever possible. A tumble dryer is not always disastrous, but it does shorten the life of thread and can make a patch work harder than necessary.
- Wash inside out to protect the stitches from abrasion.
- Use a cooler cycle rather than hot water.
- Line dry or air dry instead of relying on high heat.
- Check the repair after the first 3 to 5 washes for puckering or loose edges.
- If the area starts to wear again, reinforce early rather than waiting for a new hole to open.
I also keep an eye on the jeans after a few weeks of wear. If the repaired area softens but stays flat and secure, the mend is doing its job. If the stitching starts to dig in, I know the tension was too tight or the patch was too small. That kind of feedback is useful, because it teaches you what the garment actually needed instead of what looked nice on the worktable. The last thing I want to leave you with is the bigger reason this method has stayed relevant.
What I would do before the next pair wears through
The best denim repairs are usually the ones done before the fabric gives out completely. If a favourite pair starts thinning at the knees, between the thighs, or near the pocket corners, I would not wait for a full tear. I would reinforce the weak point early with a simple sashiko grid or a lightly layered patch. That preventive step looks modest at first, but it buys a surprising amount of extra life.
For me, that is the real appeal of visible mending: it is honest, durable, and good-looking without pretending the damage never happened. If you start with sound enough denim, choose a patch that is larger than the hole, and keep the stitches relaxed, you can turn a worn pair into something worth wearing for a long time yet.
