
The essentials that decide whether denim behaves
- Prewash first. Denim can shrink and bleed, so I wash it the way I expect the finished jeans to be laundered.
- Use the right needle. A jeans needle in 90/14 is a safe starting point for midweight denim; 100/16 is often better for heavier cloth.
- Keep construction thread simple. All-purpose polyester thread is usually best for seams; heavier thread belongs in visible topstitching.
- Stabilise the stress points. Waistbands, fly facings, pocket openings, and belt loops need interfacing or firm pocketing.
- Press constantly. Denim behaves better when every seam is pressed, graded, and flattened before the next step.
- Repair by damage, not by habit. A split seam, a frayed hem, and a worn thigh need different fixes.
Choose denim and notions before you cut
The fabric choice changes everything. In practice, I treat denim by weight and feel, not just by the label on the roll. Lighter denim is easier to handle and better for a first pair, while heavier denim gives you that classic rigid jean structure but asks more from the machine, the needle, and your patience.
| Denim type | What it feels like | Best for | What to watch |
|---|---|---|---|
| 7-9 oz denim | Flexible, softer, easier to fold | First jeans, slimmer fits, lighter everyday pairs | Can look less crisp if you want a strict workwear look |
| 10-12 oz denim | Balanced and familiar under the machine | Classic straight jeans, most all-round projects | Seam bulk starts to matter at the crotch and waistband |
| 13 oz and above | Firm, structured, stubborn in the best and worst ways | Traditional heavyweight jeans and durable repairs | Needs a strong needle, slow stitching, and careful seam grading |
I also choose notions more carefully than beginners usually do. A jeans needle and stable thread are not optional extras. For construction seams, I use all-purpose polyester thread. For visible topstitching, I switch to a heavier topstitch thread or a strong decorative thread if my machine tolerates it. Many stretch denims include a small amount of elastane, often around 2-3%, and that changes the behaviour of the fabric: it is more forgiving to wear, but it also wants less pushing and less overhandling while sewing.
For pockets and waistbands, I prefer a firm pocketing fabric and a stable fusible interfacing. That keeps the waistband from collapsing and the pocket bags from sagging out of shape after a few wears. Once the materials are right, the machine setup becomes much more predictable.Set up the machine for thick seams
Denim sewing goes badly when people expect a normal setup to cope with a thick fabric stack. I start with a fresh needle, then sew a test seam using the actual layers I will use on the garment. That test tells me more than any packet label ever will.
- Use a jeans needle in 90/14 for midweight denim and step up to 100/16 for heavier cloth.
- Set a longer stitch length: around 3 mm for construction and 3.5-4 mm for topstitching usually looks cleaner on jeans.
- Keep all-purpose thread in the bobbin for construction, even if the top thread is heavier.
- Reduce presser foot pressure if your machine feeds unevenly across bulky seams.
- Slow down over cross seams and use the handwheel when the fabric stack gets high.
- If your machine struggles, a walking foot can help, but it will not replace good seam preparation.
I also test topstitch tension before I commit to the real garment. If the heavy thread loops on the underside or disappears into the fabric, I do not force it; I either adjust the tension or keep the heavier thread only in the needle and use regular thread in the bobbin. That small decision can save an hour of frustration later.
Denim is much kinder once the machine is prepared for the thickness. From there, the real work is building the seam structure cleanly.
Build the seams that make jeans last
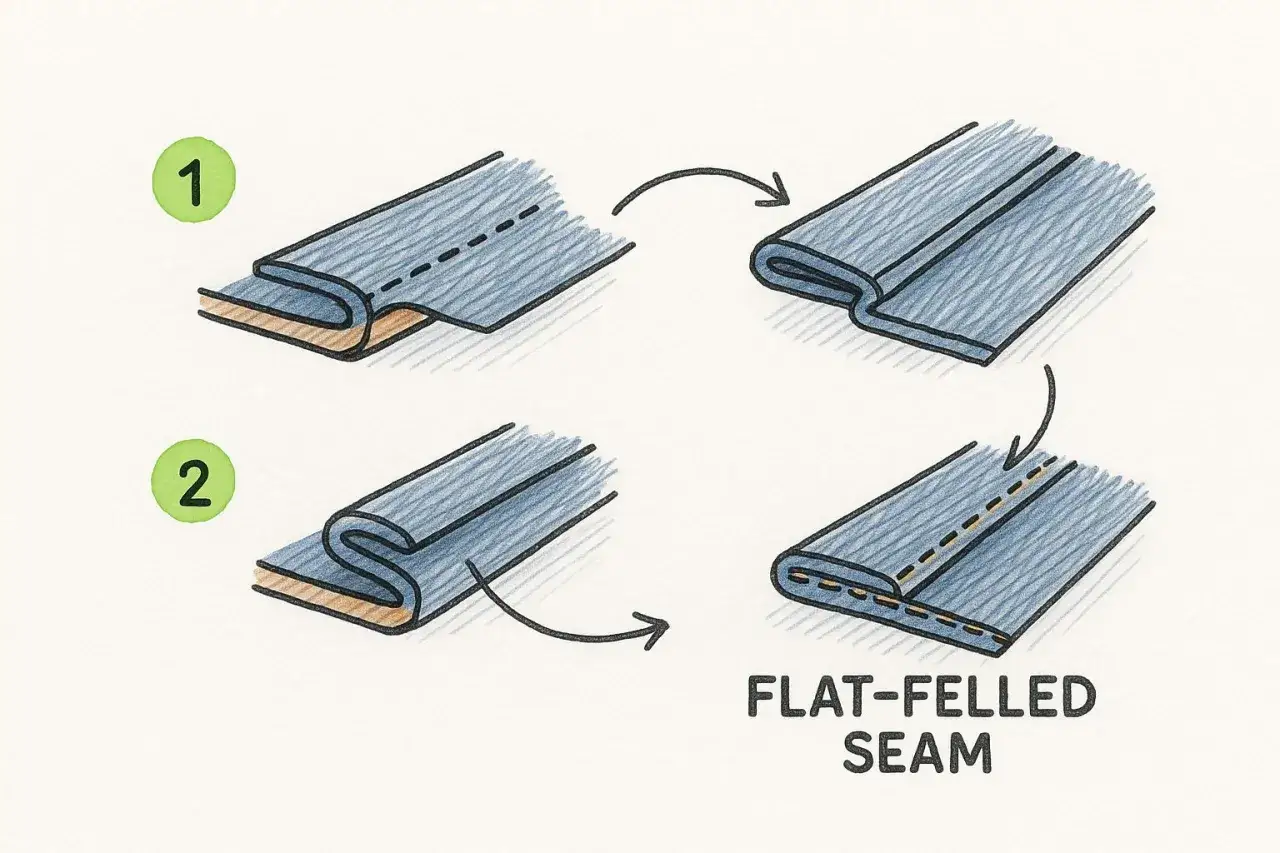
Most of the strength in jeans comes from seam construction, not from the visible style lines. The classic choice is the flat-felled seam because it encloses the raw edge and gives you a neat finish inside and out. I use it on major seams whenever the pattern and thickness allow it.
Flat-felled seams without bulk
The method is simple in theory: sew the seam, trim one allowance narrower, fold the wider allowance over the trimmed edge, then topstitch it down. The trick is in the handling. I press after every stage, grade the seam allowance so the thickness steps down gradually, and flatten bulky crossovers before I topstitch. A tailor’s clapper or even a careful tap with a hammer can help settle the seam at the crotch or inseam, where four or more layers may meet.
The seam allowance matters as much as the stitch line. If the allowance is uneven or too wide, the seam looks wobbly and the jeans feel clumsy in wear. I would rather spend an extra few minutes trimming and pressing than try to hide a lump later with topstitching.
Read Also: Sashiko Denim Repair - Fix Jeans & Make Them Last
Topstitching and stress points
Topstitching is partly decorative, but on jeans it is also functional. It marks the garment, reinforces the seam, and helps the fabric stay folded the way you want. I stitch slowly and stay slightly ahead of the needle rather than trying to steer the fabric aggressively. That matters on denim because heavy cotton does not forgive last-second corrections.
At stress points, I use bar tacks. A bar tack is a short, dense zigzag stitch that locks belt loops, pocket corners, and fly ends in place. If your machine does not have a specific bar-tack setting, a narrow zigzag over a few passes usually does the job. This is one of those details that looks small on the surface but saves the garment from coming apart in the places that get pulled the most.
Once the long seams are controlled, the next challenge is the front opening, because that is where jeans either look properly made or plainly improvised.
Get the fly, waistband, and belt loops right
The fly intimidates people because it is built in layers, not because it is mysterious. I treat it as a sequence: stabilise first, attach the zip next, then finish and topstitch only when the front sits flat. Rushing this stage is the fastest way to get a twisted fly or a waistband that pulls away from the body.
- Interface the fly facing and waistband pieces so they keep their shape.
- Sew the zipper to the fly shield and front opening in the order given by the pattern.
- Check that the fly lies flat before you commit to the final topstitching.
- Attach the waistband, then press it carefully so the edge rolls cleanly.
- Make and attach the belt loops, then secure them with bar tacks at both ends.
I also treat belt loops as structural parts, not decorative strips. They take constant tension from belts, hands, and washing, so I cut them accurately, press them sharply, and secure them well. If the waistband is the frame of the jeans, the loops are the anchors that keep that frame usable.
That front opening is where construction starts to feel like a finished garment rather than a collection of panels. After that, the fit and hem decide whether the jeans are actually wearable.
Hem and fit the legs so they wear well, not just look finished
Jeans should be tried on before the hem is final. I want to see how the leg hangs, where the knee sits, and whether the crotch feels right when I sit down. If the rise is too short or the thigh is too tight, hemming early only locks in the mistake.
There are two common hem approaches. For a new pair, I usually make a clean double-fold hem and topstitch it with the same thread logic as the rest of the jeans. If I am altering an existing pair and want to keep the factory look, I preserve the original hem and reattach it after shortening. That saves the worn-in edge, which often looks better than a fresh hem on denim that has already faded.
- If you want a clean everyday finish, use a double-fold hem and stitch it at a consistent distance from the edge.
- If you want the classic ready-to-wear look, preserve the original hem whenever there is enough length to do so.
- If the hem twists after washing, check the grain line and the way the side seams were pressed before assuming the fabric is the problem.
- If the jeans feel tight when sitting, fix the fit first; denim rarely stretches enough to rescue a poor rise.
I find that the best hems are the ones you stop noticing. They sit flat, do not kick out, and do not fight the shoe. That is the sort of finish people read as quality, even if they cannot name why.
Repairing worn jeans is a different job from making new ones
Repair work asks a different question: how much fabric is still sound? I do not choose a repair method by appearance alone. A seam that has split needs one answer, while a thigh that is thinning through the weave needs another. If I treat every problem the same way, the repair may look neat but fail quickly.
| Damage | Best repair | When it works well | When I would choose something else |
|---|---|---|---|
| Split inseam or side seam | Restitch, then reinforce with topstitching or a second line of stitching | The fabric around the seam is still strong | If the surrounding denim is fraying, I add a patch behind the seam |
| Inner-thigh thinning | Darn the worn area or patch it from the inside | The hole is small to medium, usually under about 3 cm across | If the area is larger or the cloth is shredded, patching is safer |
| Frayed hem | Re-hem or preserve the original hem if there is enough length | The leg can be shortened without ruining the fit | If shortening would make the jeans awkward, I leave the hem and reinforce it instead |
| Pocket-corner tear | Pocket patch plus bar tack or short reinforcement line | The tear is local and the pocket bag still holds its shape | If the pocket opening has stretched badly, the whole pocket may need rebuilding |
For worn thighs and seat areas, visible mending is often the honest choice. I like invisible repairs when the damage is small and the cloth still has some strength, but I stop chasing invisibility when the fabric has become too thin to support it. At that point, a patch or a deliberately visible reinforcement is more durable, and durability is the point.
The important thing is to repair the structure before the hole grows. Once denim starts to blow out at a stress point, the weak area tends to spread faster than most people expect.
What usually goes wrong and how I fix it
Most denim problems are not dramatic. They are small process mistakes that compound: a blunt needle, too much speed, not enough pressing, or a seam allowance that never got graded down. I see the same handful of issues over and over, and the fixes are usually straightforward once you name them.
- Skipped stitches. Change the needle first; denim often exposes a needle that is simply past its best.
- Thread nests on the back. Recheck bobbin threading and tension before touching the top tension dial.
- Bulky cross seams. Trim, grade, and flatten before sewing across them again.
- Wavy topstitching. Slow down, lengthen the stitch slightly, and guide the fabric rather than dragging it.
- Pockets that sag. Use firmer pocketing and stabilize the pocket opening with interfacing or a reinforcement row.
- Twisted legs. Check grain alignment at cutting stage; once the twist is built in, it is hard to remove cleanly.
I would rather fix the cause than chase the symptom. A machine that skips stitches on denim does not need more force; it usually needs a better needle, a cleaner thread path, or a slower stitch line. A seam that feels too thick does not need to be bullied flat; it needs to be trimmed, pressed, and planned better from the start.
The details that keep denim in rotation
If I were making another pair tomorrow, I would spend most of my energy on three things: fabric choice, seam control, and fit. Decorative stitching matters, but it is the least important part of a good pair if the crotch pulls, the waistband caves in, or the seam bulk makes the legs stand away from the body. The jeans you reach for again and again are usually the ones with the quietest problems, not the flashiest topstitching.
The same logic applies to repairs. Match the repair to the damage, reinforce the places that take strain, and accept that some fixes are meant to disappear while others are meant to show. That is the difference between a quick patch and a garment that earns a second life. When the fabric, the machine setup, and the finishing all agree, the result feels solid rather than homemade.
