
A sports bra made at home only works when the support is built into the structure, not added as an afterthought. In practice, that means choosing the right fabric stretch, underband tension, strap width, and finishing method before you touch the scissors. A diy sports bra can be surprisingly effective for yoga, lifting, walking, and some cardio, but only if the design matches the activity and the fit is checked properly.
The essentials before you cut a single piece
- Decide first whether you need light, medium, or high support.
- Use fabrics with strong recovery, not just any stretch knit.
- Power mesh or powernet adds structure without much bulk.
- A stretch stitch, narrow zigzag, or overlocker keeps seams flexible.
- Expect at least one mock-up if you want a comfortable fit.
Match the design to the activity
I start with use case, because support level changes everything else. A bra for Pilates can be soft and pull-on; a bra for running needs more containment, more stability, and usually a firmer underband. If I get that decision wrong, no amount of decorative stitching will rescue the fit.
The two ideas that matter most are compression and encapsulation. Compression presses the bust closer to the body as one unit, while encapsulation supports each side more individually with shaping and seaming. Most home sewing projects use a blend of both, and that is usually the sweet spot for comfort and support.
| Use case | Best structure | What it feels like | Difficulty |
|---|---|---|---|
| Yoga, Pilates, lounging | Pull-on, double-layer style | Soft, close, minimal hardware | Beginner |
| Gym training, brisk walking, cycling | Lined racerback or cross-back | Secure but still flexible | Intermediate |
| Running, HIIT, dance, larger busts | Seamed cups or closure-back design | Firmer hold, more adjustment | Advanced |
If you want one garment to do everything, I would not force it. A design that is comfortable for stretching can still bounce too much for sprint intervals. That is why I treat the first question as practical, not decorative, and then move on to fabric choice with that answer in mind.
Choose fabrics and notions that do the support work
I would never choose a pretty print before I know whether the knit actually recovers well. For a sewn sports bra, recovery matters more than almost anything else: the fabric should stretch and then spring back without staying baggy. If it sags after a few stretches in your hands, it will not hold you securely on the body.
In the UK, you will often see power mesh sold as powernet. It is a firm stretch mesh used to stabilise the body of the bra without making it feel rigid or sweaty. That single layer often makes the difference between a comfortable support garment and something that looks right on the hanger but collapses in wear.
| Material | What I use it for | What to look for |
|---|---|---|
| Athletic knit | Outer layer with a smooth finish | Medium weight and strong recovery |
| Cotton spandex | Comfortable lining or low-impact version | Soft hand feel, but not too limp |
| Power mesh or powernet | Internal support layer, especially at the front and wings | Firm enough to resist distortion |
| Plush-back elastic | Neckline and armhole finishing | Soft side against the skin |
| Underband elastic | Main lower support point | Wide enough to hold, not cut in |
| Hook-and-eye closure | Adjustability and easier dressing | Flat, secure, and comfortable on movement |
As a rule of thumb, I reach for 1.5 to 2 cm elastic at the neckline and armholes for smaller builds, and 2 to 3.5 cm underband elastic when I want firmer support. Removable cups can improve modesty and shape, but they do not replace structure; they are an add-on, not the engine of the garment. If you want a bra that feels substantial, the support must come from the fabric system, not only from padding.
One quick test saves a lot of frustration: stretch the fabric across your hands and release it. If it rebounds quickly and cleanly, it is a better candidate than something that droops or waves after the stretch. That little check tells me more than a product description usually does, and it leads neatly into planning the pattern itself.
Measure, draft, and plan the negative ease
For bras, fit starts with measurements taken snugly, not generously. I measure underbust, full bust, high bust, and strap length, all in centimetres, because the bra needs to sit close to the body without strangling it. The key concept here is negative ease, which simply means the finished garment is smaller than the body measurement so the stretch can create tension.
As a starting point, I usually aim for 5 to 10 percent negative ease at the underband for a firmer performance knit, and a little less for a soft lounge version. The exact figure depends on how much recovery the fabric has and whether the bra has a closure. A pull-on style generally needs more careful calibration than a back-closure design because there is no hardware to help you fine-tune the fit.
If you already own a bra or bralette that fits well, tracing it is smarter than inventing a shape from scratch. I like to start with a trusted outline, then adjust the following points:
- Raise the underarm if the side bust needs more containment.
- Widen the band if the back rides up.
- Shorten the straps if the front drops too low.
- Add depth at the front if the bust feels compressed in the wrong place.
- Round the neckline slightly if the upper edge digs or gaps.
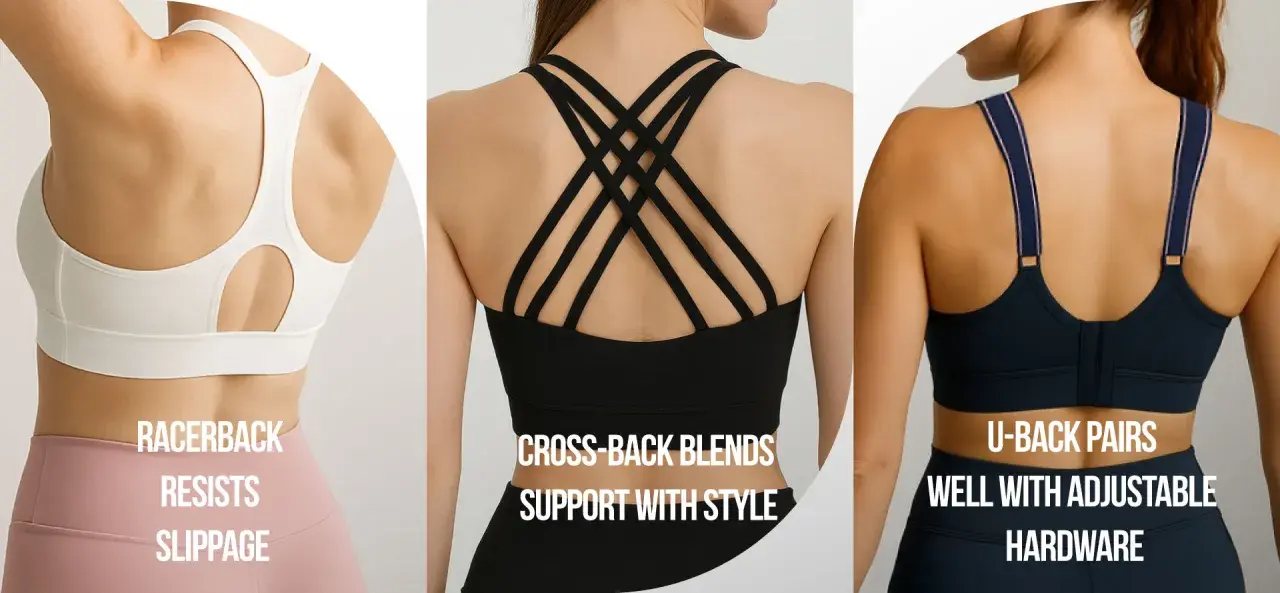
At this stage, I also decide whether I want a racerback, cross-back, or straight strap layout. Racerbacks usually keep straps from slipping and are popular for training bras; straight straps can be easier to sew but sometimes need more frequent adjustment. Once that shape is settled, the sewing order becomes much simpler.
Sew the bra in a logical order
There is a right order for this kind of project, and it matters. I baste more than I would on woven garments, because knits shift and the layers can drift before the final seam is even finished. Baste means temporary stitching that holds the fabric in place before the real seam goes in.
- Cut all pieces carefully, matching grain and stretch direction.
- Baste the outer fabric, lining, and any power mesh layers together where they need to behave as one unit.
- Sew the main body seams with a stretch stitch, narrow zigzag, or overlocker.
- Stabilise the underband with the correct elastic, stretching it evenly as you sew.
- Finish the neckline and armholes with fold-over elastic, binding, or a neat self-fabric band.
- Add straps, closures, and removable cup openings if the design uses them.
On a home machine, a narrow zigzag or stretch stitch is usually the safest option, and I set my stitch length around 2.5 to 3 mm as a practical starting point. A walking foot can help if the layers start to shift, but it is not mandatory. What matters more is consistency: if one part of the bra is stretched too tightly and another part is left loose, the garment will feel unstable even if the seams look tidy.
Where the support is built
I pay the most attention to the underband, side seams, and strap junctions. Those are the points that carry movement, sweat, and tension. If the underband is too loose, the bra rides up. If the straps are doing all the work, they dig into the shoulders and the bust still bounces. That is why a good bra distributes load instead of letting one narrow strip of elastic try to solve everything.
Read Also: Sew Perfect V Necklines - Master Techniques & Avoid Mistakes
What I finish last
Padding, topstitching, and decorative details come after the structure is stable. If the bra needs removable cups, I leave the opening clean and secure rather than squeezing them in at the end. The cleanest result is the one where every layer has a job, and no layer is trying to compensate for a weak seam underneath.
Fit it on the body and correct the usual problems
I do not trust the mirror alone. I ask the wearer to move: arms up, arms across the chest, bend forward, march in place, and, if the garment is for training, do a brief jog or a few jumping jacks. If the bra shifts during that test, the problem is usually obvious once you know where to look.
| What you notice | Likely cause | What I change |
|---|---|---|
| Band rides up at the back | Underband too loose or straps too tight | Shorten the band or ease off the straps |
| Neckline gapes | Edge too loose or front not shaped enough | Tighten the finishing elastic or add front depth |
| Bust spills at the sides | Front too narrow or armhole too low | Widen the front panel or raise the side seam |
| Straps dig into shoulders | Band is not carrying enough of the load | Increase underband support and widen straps |
| Fabric feels secure but still bouncy | Material is too soft or not enough internal structure | Add power mesh, firmer elastic, or a more shaped design |
| Edges feel scratchy | Elastic too harsh for the skin | Switch to plush-back elastic or softer binding |
This is where a home-sewn bra either earns its place or gets demoted to loungewear. Small changes make a big difference, and I rarely need to alter everything. Usually one or two corrections solve most of the discomfort, which is why I like to fit before I finish every decorative detail.
Make the first version useful beyond the first wear
The most practical thing I can add is simple: keep notes. Write down the fabric, the elastic widths, the stitch type, the seam allowance, and any changes you made after the fitting. If the bra works, that information lets you repeat it. If it fails, the notes show you exactly where the structure broke down.
I also prefer to make one test version in a less expensive knit before I cut the final fabric. That first sample tells me whether the support is enough, whether the straps are in the right place, and whether the neckline sits flat. Once the pattern works, I store it as a repeatable base rather than treating the next project like a fresh guess.
Care matters too. Wash the bra cool, avoid fabric softener if you want the elastic to last, and line dry whenever possible. Heat is rough on recovery fabrics, and a bra that looked perfect on day one can lose shape quickly if it is tumble dried too often. If you build the piece carefully and look after the stretch, a home-made sports bra can stay reliable far longer than most people expect.
