
I’m focusing on the practical side here, because that is where most of the confusion sits. The same needle style can produce a neat T-shirt hem or a disappointing mess, depending on how wide it is, how thick the fabric is, and whether the machine can clear the needle path properly.
The essential points at a glance
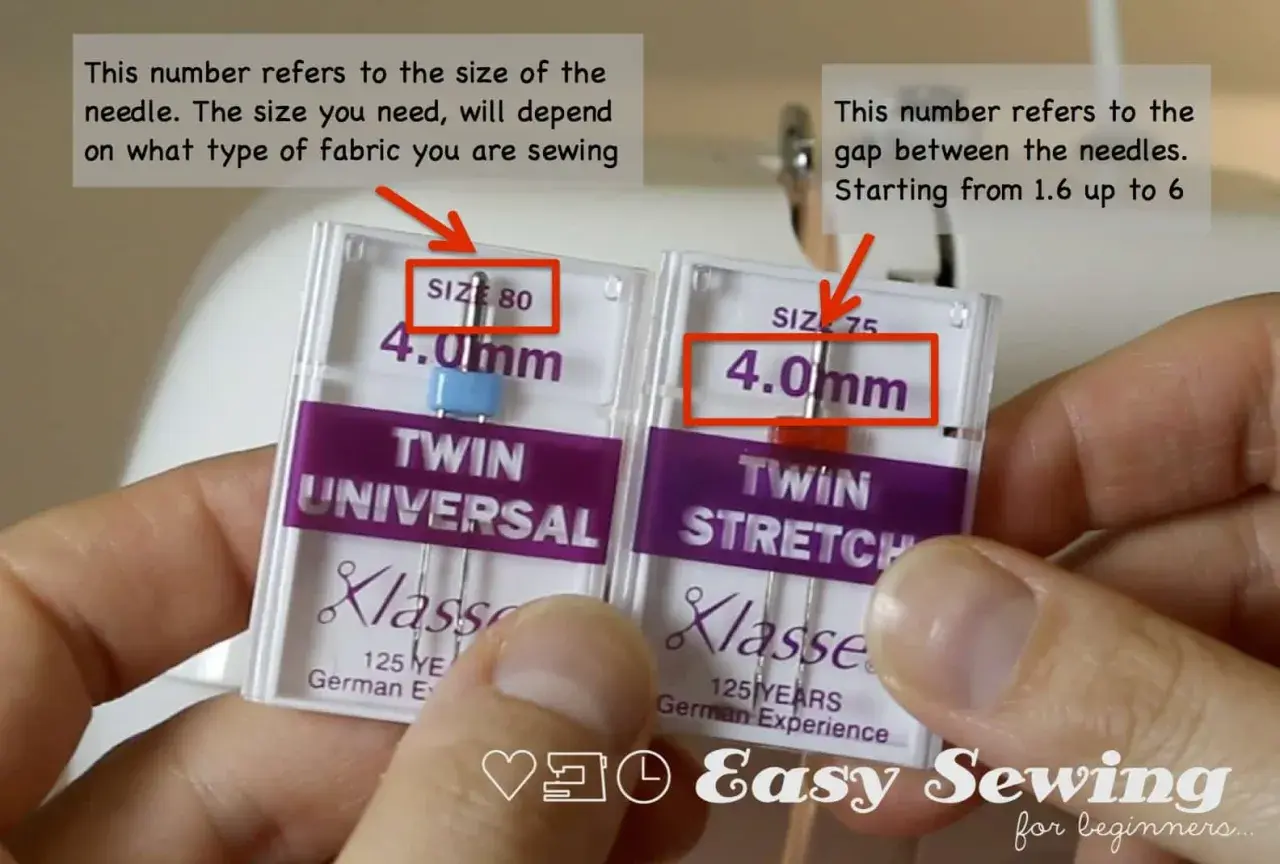
- The first number on the packet is the spacing between the two needles, measured in millimetres.
- The second number is the needle size, so 70, 80, 90, or 100 tells you how fine or sturdy the needle is.
- For most everyday dressmaking, 2.0/80, 2.5/80, or 3.0/90 is the easiest starting point.
- Stretch fabrics usually behave better with a stretch twin than with a universal one.
- Wider needles need more clearance in the presser foot and stitch plate, so machine compatibility matters as much as fabric choice.
How to read the size code on the packet
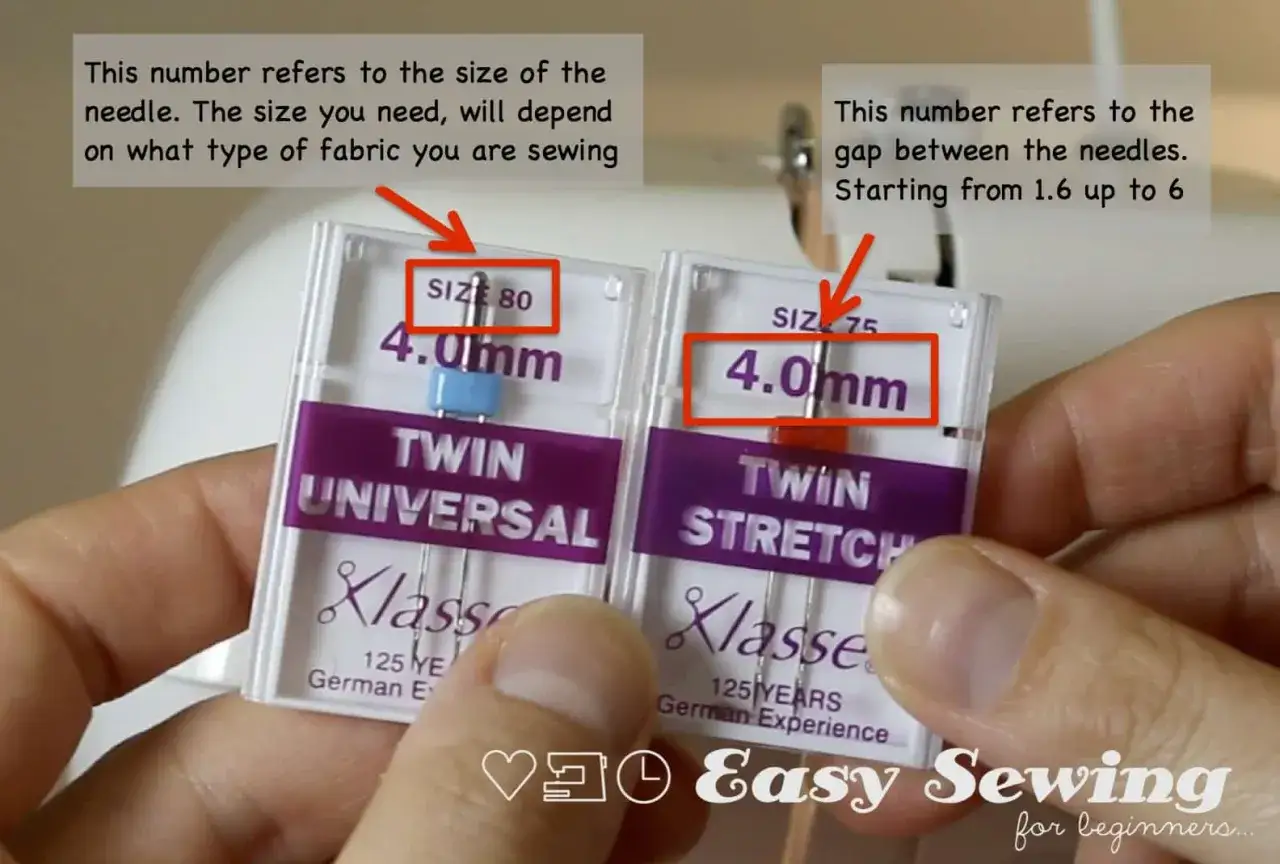
The size label is doing two jobs at once. In a marking such as 3.0/90, the first number is the distance between the two needles, and the second number is the needle size. So 2.0/80 is narrower and slightly finer, while 4.0/100 is wider and stronger.
That matters because the spacing changes the look of the stitching, while the needle size changes how easily the pair pushes through the fabric. Schmetz lists universal twin needles from 1.6/70 right up to 8.0/100, which is a good reminder that there is no single “standard” twin needle. There is a useful spread of options, and the best one depends on the fabric and the finish you want.
| Packet marking | What it means | Why it matters |
|---|---|---|
| 1.6/70 | 1.6 mm spacing, size 70 needles | Very narrow and fine for delicate work and tiny hems |
| 2.0/80 | 2.0 mm spacing, size 80 needles | Lightweight fabrics and neat, understated topstitching |
| 2.5/80 | 2.5 mm spacing, size 80 needles | A balanced all-round option for many garments |
| 3.0/90 | 3.0 mm spacing, size 90 needles | A slightly bolder finish with more room for medium fabrics |
| 4.0/100 | 4.0 mm spacing, size 100 needles | Useful for denim, firmer wovens, and visibly decorative seams |
| 6.0/100 to 8.0/100 | Wide spacing with a sturdy needle size | Statement stitching, but not suitable for every domestic machine |
If you remember one thing, remember this: spacing controls appearance, size controls strength. Once that clicks, choosing becomes much easier, and the next question is how that translates into actual fabrics and seams.
Which sizes suit which fabrics and seams
For everyday sewing, I start with the fabric rather than the packet. Fine knits, lightweight jersey, and narrow hems usually work best with a smaller spacing. Medium fabrics can handle a little more distance between the needles, and heavier fabrics often need both more spacing and a sturdier needle size.
| Fabric or project | Good starting size | Why I would choose it | Watch-outs |
|---|---|---|---|
| Baby clothes, light T-shirt hems, delicate knits | 1.6/70 or 2.0/80 | Keeps the finish subtle and reduces bulk | Too wide can look heavy and may pucker |
| Standard jersey, sweatshirting, casual tops | 2.5/80 or 3.0/90 | Gives a balanced hem with enough strength | Test for tunnelling before sewing the full garment |
| Shirting cotton, poplin, quilting cotton | 2.0/80 to 3.0/90 | Works well for crisp topstitching and tidy hems | Very fine cloth may show needle holes if the size is too large |
| Denim, twill, canvas | 4.0/100 | Handles thicker layers and makes a stronger visual line | Not every machine gives enough clearance for the widest twin needles |
| Decorative seams on stable woven fabric | 4.0/90, 6.0/100, or 8.0/100 | Creates a bold, more fashion-led finish | Best on machines with generous stitch width and a clear needle path |
I usually think in terms of “quiet” versus “visible” stitching. A 2.0 or 2.5 mm spacing blends into the garment. A 4.0 mm spacing starts to look intentional and graphic. Anything wider is less about invisibility and more about design, which is great if that is the effect you want. That brings us to the needle type itself, because spacing alone still does not tell the whole story.
Choose the needle type as carefully as the width
Different twin needles are made for different fabrics, and the name on the packet is often the clearest clue. I treat the type as a second filter after size, because it solves problems that spacing alone cannot fix.
- Universal twin works well for cottons, shirtings, and many stable everyday fabrics. It is the safest all-round starting point.
- Stretch twin is the better choice for jersey, ribbing, and other elastic fabrics. The ballpoint profile helps the needle pass through knit structure more cleanly.
- Jeans twin is made for denim and heavier woven fabric. It is the one I reach for when the seam needs to look strong as well as neat.
- Topstitch or embroidery twin suits decorative work where the stitch line itself is part of the design.
- Hemstitch twin is more specialised and gives a decorative heirloom effect on woven cloth.
The important point is that the best-looking hem is usually the one that suits the fabric first and the styling second. A stretch twin on jersey almost always behaves better than a universal twin of the same size, even if the packet looks similar. If you sew across different fabric weights, keeping more than one type in your sewing box is worth the small extra cost.
There is also a practical reality here: a twin needle is not the same thing as a coverstitch machine. It can imitate a coverstitch-style hem very well from the top, but the underside and the way the fabric feeds are different. That is fine for plenty of garments, just not a reason to expect one tool to replace the other completely.
Set up the machine so the needles clear cleanly
Even the right size will misbehave if the machine is set up badly. I always check compatibility before sewing a full seam, because the width, presser foot, and stitch plate all have to give the twin needle enough room to move without striking anything.
- Check your machine manual for the widest twin needle it supports.
- Make sure the needle system matches the machine, not just the spacing.
- Thread the two top threads separately, using two spools if possible.
- Use the twin-needle setting if your machine has one, because it narrows the stitch path where needed.
- Slow down and turn the handwheel through the first few stitches by hand.
- Test on the actual fabric layers you plan to sew, not a thinner scrap.
Machine settings matter too. If the seam tunnels, shortening the stitch length often helps, because the stitches sit closer together and control the fabric better. BERNINA notes the same basic idea in its twin-needle guidance, and it is one of the most reliable fixes when a hem starts to ripple or stand proud. I also adjust tension cautiously, one small step at a time, because over-correcting usually creates a new problem rather than solving the old one.
If your machine has a twin-needle function, use it. On many domestic machines it simply reduces the effective width so the needles clear the foot and stay within a safe stitch path. That small setting can be the difference between a smooth run and a bent needle.
The mistakes that cause the worst results
Most twin-needle problems come from a small number of predictable mistakes. The good news is that they are easy to avoid once you know what to look for.
- Choosing by width alone without thinking about fabric weight.
- Using a wide needle on a narrow hem allowance, which can leave no room for the stitching line.
- Ignoring machine clearance and letting the needles hit the foot or plate.
- Skipping the test seam, especially on knits where tunnelling shows up quickly.
- Using a universal needle on stretch fabric when a stretch twin would behave better.
- Expecting the underside to look identical to the top, when the bobbin stitch naturally creates a different finish.
Of those, the one I see most often is the missing test. A twin needle can look perfect on one layer and completely different on three layers with elastic in the seam. The scrap test is not a box-ticking exercise; it is how you find the real width, stitch length, and tension before the garment is on the line. That makes it much easier to choose the next needle size with confidence.
The three needles I would keep ready for most dressmaking
If I were building a small, practical set for a UK sewing room, I would start with three options. A 2.0/80 or 2.5/80 universal twin covers a lot of lightweight woven work and neat hems. A 3.0/90 stretch twin is the one I would keep for jersey and everyday knitwear. A 4.0/100 jeans twin earns its place if you sew denim, canvas, or any project where the topstitching needs to look deliberate and sturdy.
- Use the narrow needle for delicate hems and subtle finishes.
- Use the medium one for most garments and casual clothing.
- Use the wider, sturdier one when the seam has to show and the fabric can support it.
If you want the simplest possible rule, buy for the fabric you sew most, not for the widest packet on the shelf. For many home sewists, that means starting with a medium twin needle and adding a stretch version once knit projects become regular. That way the tool box grows around the work you actually do, which is usually the most sensible way to approach twin needles in the first place.
