
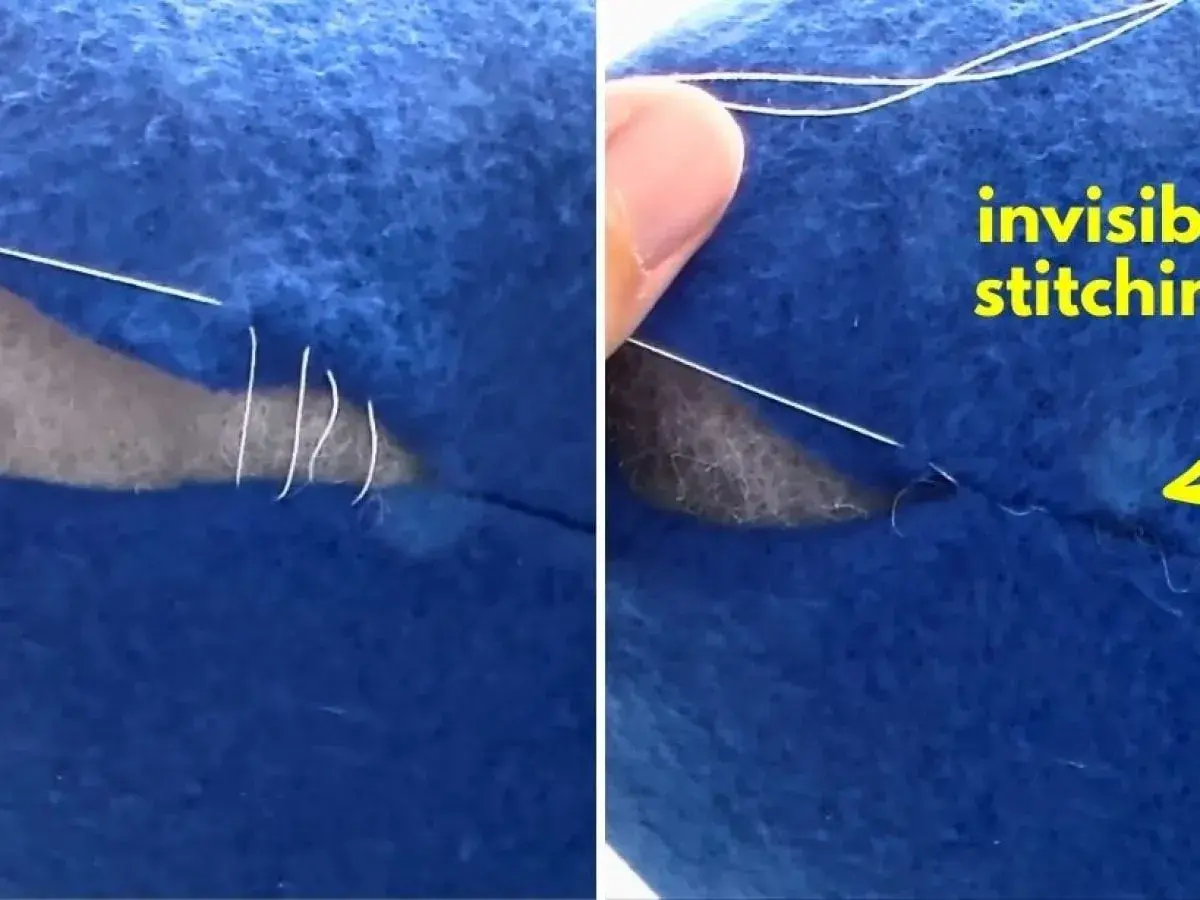
The essentials before you start
- Use a thread colour that blends into the fabric and a sharp needle that suits the weight of the cloth.
- Keep each stitch bite tiny, around 3 mm or 1/8 inch, so the seam stays discreet.
- The ladder stitch is ideal for closing openings in cushions, soft toys, bags and small repairs.
- For hems and folded edges, a slip stitch or blind hem is usually the cleaner choice.
- Pull the thread gradually. If you tug too hard, the fabric will pucker and the finish stops looking invisible.
- If the fabric frays, finish the raw edge first with an overedge, zigzag or serger stitch.
What an invisible seam really does
When I talk about an invisible seam, I am usually talking about a hand finish that hides the thread on the right side of the fabric while keeping the join secure. The needle takes tiny bites from each folded edge or from the seam allowance, so the thread sits inside the fold rather than across the surface. Once the stitches are tightened, the seam looks neat and uninterrupted from the outside.
That is why this technique is so useful for turning openings in cushions, soft toys, bag linings and small repairs. It is not meant to be decorative; it is meant to disappear. If you can see the stitches clearly from the right side, the bites are probably too long, the thread is too visible, or the fabric has been pulled too tightly. Once that logic clicks, the hand technique becomes much easier to control.
From there, the practical question becomes simple: which version of the stitch should I use for this job? That is where the ladder stitch, slip stitch and blind hem split apart.
How I sew the ladder stitch by hand
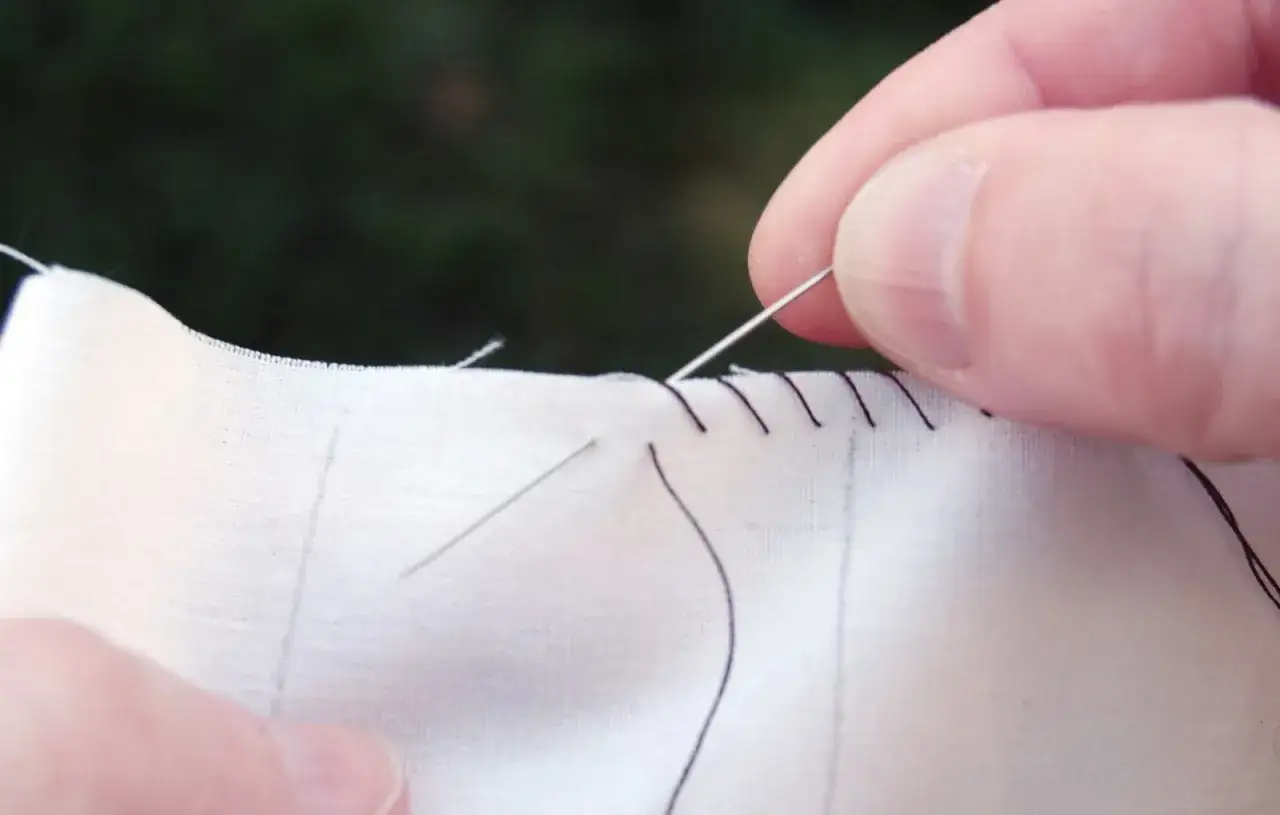
For closing openings, the ladder stitch is the version I reach for first. It works especially well on projects that have been turned right side out and need the final gap closed without the repair showing. I prefer a matching thread and a sharp needle, with either a single strand or a double strand depending on the fabric and how sturdy the join needs to be.
- Press or finger-press the opening so the folded edges sit neatly against each other.
- Thread the needle with matching thread and knot the end securely.
- Bring the needle out from inside the fold at one side of the opening.
- Take a tiny stitch on one side, parallel to the edge, then take the same size stitch on the other side.
- Repeat from side to side, keeping each bite short, about 3 mm or so, so the stitches stay hidden.
- Every few stitches, pull the thread gently so the ladder collapses into the seam instead of sitting on top of it.
- Finish by running the needle under the last stitch or looping the thread to secure it, then trim the tail close to the fabric.
The part most beginners get wrong is the tension. I tighten in stages, not all at once. If you pull hard straight away, the opening puckers and the fabric starts to gather, which defeats the whole point. Slow tightening gives the stitch time to sink into the fold and disappear.
For a cushion cover, toy seam or pouch turning hole, this is usually enough to give a strong, tidy repair. It is also the stitch I use when I want the join to behave like the original seam rather than sit on the surface as a visible line.
When slip stitch or blind hem is the better choice
People often use “invisible stitch” as a catch-all phrase, but in practice I separate these techniques by job. If I am closing an opening, I use a ladder stitch. If I am finishing a hem or attaching a folded edge, I usually move to a slip stitch or a blind hem. The result may look similar from a distance, but the construction is different and that affects how the fabric hangs.
| Technique | Best for | What it looks like | My take |
|---|---|---|---|
| Ladder stitch | Closing gaps in cushions, toys, bags and small repairs | Nearly invisible once tightened | The best all-round hand finish for openings |
| Slip stitch | Joining folded edges, hems, linings and bindings | Very discreet on the right side | Better when you want a flexible, hand-finished edge |
| Blind hem | Trousers, skirts, curtains and traditional hems | Hidden from the right side, tidy on the wrong side | The neatest choice for hems when the fold needs to stay flat |
If the fabric is a weave that frays, I also finish the raw edge before hemming. A zigzag, overedge or serged finish stops the edge from crumbling after the invisible stitches are in place. For stretch fabric, I would not force a standard hand hem if the cloth needs movement; a stretch blind hem or a looser hand finish is usually safer. That choice matters more than the stitch itself, which leads straight into the mistakes that spoil the effect.
The mistakes that make the stitch visible
The stitch usually shows for one of five reasons, and none of them are mysterious. They are small handling errors that add up quickly.
- The stitches are too long. Long bites sit on the surface and are easy to spot, especially on smooth fabrics.
- The thread is too dark or too thick. Even a well-made seam will show if the thread stands out from the cloth.
- The tension is too tight. Over-tightening creates puckers and flattens the fabric in a way that catches the eye.
- The edges were not prepared properly. Ragged or uneven folds make the join crooked, so the seam cannot disappear cleanly.
- The wrong stitch was used for the job. A ladder stitch is brilliant for openings, but it is not the best answer for every hem.
My rule is simple: if the join starts to look bulky, I stop and adjust before I continue. I shorten the bite, ease the tension, or remake the fold. On delicate fabric, I also keep the needle finer and the thread lighter so the seam does not fight the cloth. That kind of restraint is what makes the finish feel professional rather than merely hidden.
The fabric itself then decides how much forgiveness you have, so the next adjustment is about material rather than technique.
How I adapt it for different fabrics
I do not sew every invisible stitch the same way, because fabric weight changes everything. A crisp cotton lawn wants tiny, neat bites. A wool coating or textured upholstery fabric can tolerate slightly longer stitches because the surface texture helps conceal them. The wrong stitch length on the wrong cloth is one of the fastest ways to ruin a clean finish.
- Lightweight cottons and linings: keep the stitches small and neat, and press the fold before sewing so the edges stay aligned.
- Wool and textured fabrics: use slightly longer, less dense stitches so the fabric does not buckle around the seam.
- Silk and viscose: use a fine needle and light tension, because these fabrics show every misplaced bite.
- Knits and stretch fabrics: use a stitch that allows movement, or a stretch blind hem if you are finishing a hem on a machine.
- Fraying fabrics: finish the raw edge first, otherwise the hidden seam may fail when the edge starts to unravel.
When I am repairing something like a jacket lining or a bag opening, I also think about access. If the seam sits deep inside the garment and I cannot comfortably work from the wrong side, I will choose the hand stitch that gives me the most control from the visible side without creating a ridge. That practical judgement matters more than memorising stitch names.
Once the fabric is matched to the stitch, the finish usually comes down to the last few checks I make before putting the project aside.
The last checks I use before I call it finished
Before I call a seam invisible, I always look at it from the right side in good light, then flex the fabric in my hands. If the seam opens, shows thread flashes or starts to ripple, I know it needs one more pass. I would rather redo three centimetres now than live with a line that catches the eye every time the item moves.
My final checks are practical, not fussy: the edges should sit flat, the thread should blend into the cloth, and the closure should feel secure when I gently pull it apart. If the fabric is bulky, I trim and grade the seam allowance before stitching. If it is delicate, I keep the tension softer and avoid overpressing. Those small decisions are what make the finish look quiet instead of obvious.
That is the real value of an invisible stitch: not that it hides the sewing entirely, but that it lets the fabric look finished without drawing attention to the repair. Once you match the stitch to the job and keep the bites small, the seam does exactly what it should and then disappears into the background.
