
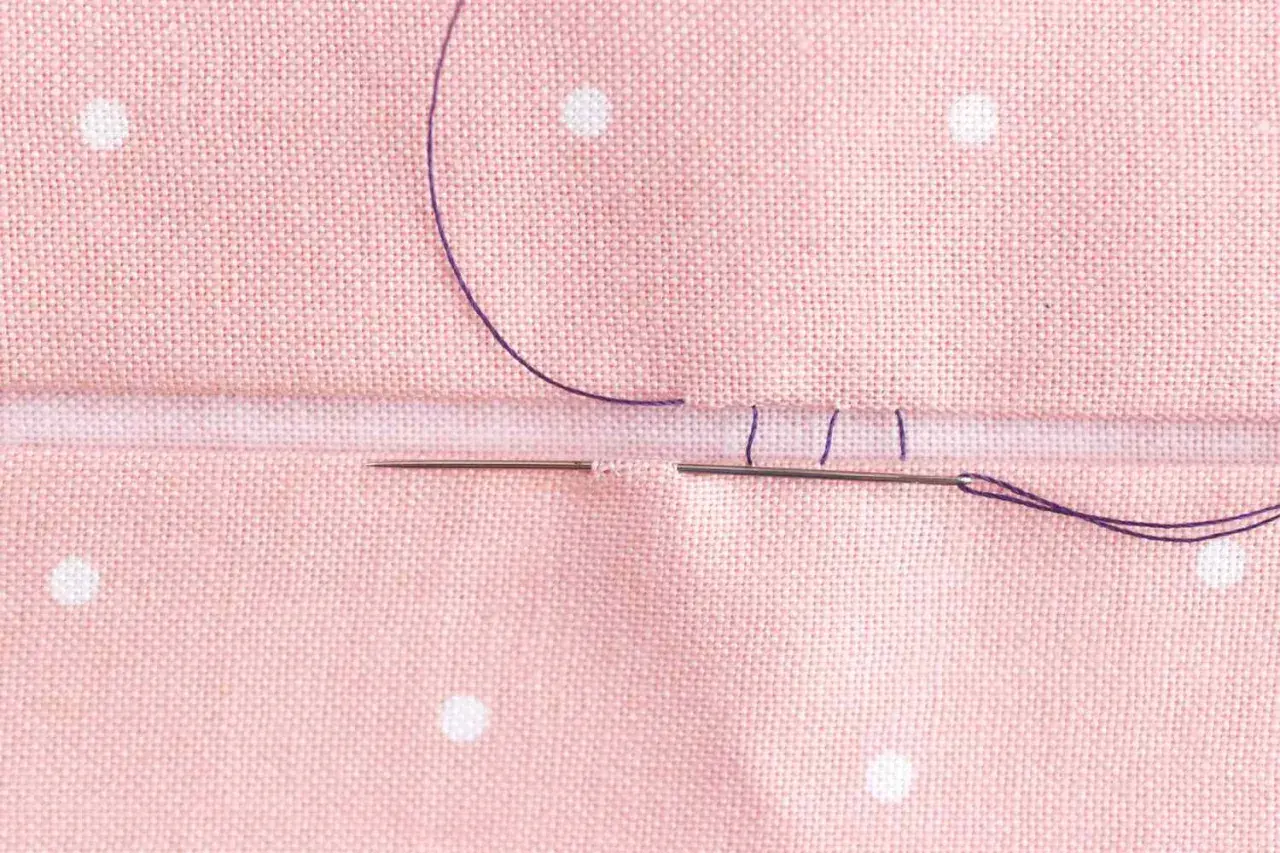
A good invisible hem stitch keeps the outside clean while still giving the hem enough strength to last. In practice, the result depends less on magic and more on three things: the fabric, the fold, and how carefully you catch the stitches. I use this finish whenever I want trousers, skirts, or dresses to look properly tailored without a visible line of thread on the right side.
A neat blind hem depends more on preparation than on expensive tools.
- The aim is to secure the hem from the inside while keeping stitches hidden from view on the outside.
- It works best on stable woven fabrics, tailored trousers, skirts, dresses, and curtains.
- Pressing matters as much as stitching; a sloppy fold will show even if the thread is perfect.
- Hand sewing gives the cleanest control on delicate or curved hems.
- A sewing machine is faster, but it needs the right fold, stitch setting, and test piece.
- Very stretchy knits often need a different approach, because a standard blind hem can pucker or tunnel.
What a blind hem actually does
The whole point of a blind hem is simple: hold the folded edge in place without showing a row of stitches on the face of the garment. I think of it as a compromise between strength and discretion. You are not trying to make the stitching disappear by luck; you are placing it where the eye does not naturally go.
That makes it ideal for hems that should look refined rather than decorative. Tailored trousers, midi skirts, suit trousers, lined dresses, and even curtain hems all benefit from this finish. On very casual garments, a visible topstitch may be fine, but on smarter pieces the hidden hem makes a real difference to the final impression.
The technique is less successful when the fabric is too bulky, too slippery, or too stretchy for a clean fold. In those cases, the hem may show through, ripple, or weigh the garment down. Before I start stitching, I decide whether the fabric can support a discreet fold without fighting me. That leads straight into prep, because preparation is where the result is won or lost.
The preparation that decides whether it disappears
If the hem is going to look invisible, the fold must be exact. I measure the finished length, press the turn-up, and mark the fold line before I pick up a needle. For most woven garments, a hem allowance of about 2.5 to 5 cm is practical; narrower than that, and you have very little margin for catching stitches neatly.
| Fabric or garment type | Best approach | Why it works |
|---|---|---|
| Tailored trousers and skirts | Blind hem by hand or machine | Clean finish, little visible stitching, good for formal wear |
| Light to medium woven cotton, wool, viscose | Blind hem by hand | Easy to control the stitch bite and keep the face neat |
| Heavy wool or bulky fabric | Machine blind hem or a narrower hand hem | Less bulk at the fold, fewer lumpy edges |
| Very stretchy knit | Stretch blind hem or another elastic finish | Prevents tunnelling and broken stitches |
I also check the edge before sewing. If the fabric frays, I finish the raw edge first with a zigzag, overlocker, or a narrow binding, because an unfinished edge can distort the hem over time. On delicate fabrics, a pressing cloth helps protect the surface, and on curved hems I press in short sections rather than forcing one long fold. Once the fold is stable, the actual stitching becomes much easier. That is why I prefer to talk about the technique only after the prep is right.
How I sew it by hand
Hand stitching gives the most control, and it is the method I reach for when the hem must look as clean as possible. It is especially useful on formal skirts, lightweight trousers, and hems where the machine would be awkward to guide. I also prefer it when the fabric is fragile, because I can control exactly how much I bite into the outer layer.
- Press the hem allowance into place and secure it with pins or clips every few centimetres.
- Thread a needle with matching thread and knot one end neatly.
- Pick up just a few threads from the garment fabric on the right side, then move into the hem fold for the next stitch.
- Repeat in small intervals, keeping the thread relaxed rather than pulled tight.
- Press the hem again once it is stitched, so the fold settles flat and the stitches sink back into the fabric.
The important part is the bite. If you catch too much fabric, the stitch will show; if you catch too little, the hem can fail. I aim for tiny, even catches and a rhythm that stays consistent all the way round. On a straight hem, that is straightforward; on a curved hem, I shorten the stitch spacing slightly so the edge lies smoother. When that balance is right, the hem looks almost as if it was never sewn at all.
How I set up the machine version
A sewing machine blind hem is faster, and on some jobs it is the sensible choice. I use it for longer hems, thicker everyday fabrics, and pieces where speed matters more than absolute invisibility. The trick is not the machine itself; it is learning how the stitch should just catch the fold instead of cutting deeply into the face of the garment.
Most machines have a blind hem setting or a stitch that alternates straight stitches with a wider bite. I start with a test scrap, because the first adjustment often decides whether the stitch sits neatly or wanders. A sensible starting point is a stitch length around 2.5 to 3 mm, then adjust the width and needle position according to the machine’s own guide. If the stitch lands too far into the garment, it will show. If it barely catches the fold, it may not hold.
Here is how I think about hand and machine methods side by side:
| Method | Best for | Main advantage | Main limit |
|---|---|---|---|
| Hand blind hem | Delicate fabrics, formal garments, curved hems | Maximum control and the neatest finish | Slower and more technique-sensitive |
| Machine blind hem | Longer hems, heavier fabrics, regular sewing | Fast and consistent once set up | Can show more on the right side if adjusted badly |
I do not treat the machine as a shortcut; I treat it as a different tool with different risks. If I cannot get a clean result on a scrap, I do not move on to the garment. That habit saves more hems than any fancy foot ever will. From there, the next question is what usually goes wrong, because most failures are predictable.
The mistakes that make the stitch show
Most visible hems are not caused by bad luck. They come from small, repeated errors that are easy to avoid once you know what to look for. The main one is uneven stitch depth: some bites are too deep, others too shallow, and the result looks wobbly from the outside. I also see hems ruined by poor pressing, which leaves the fold soft and unstable before the first stitch is even placed.
- Not pressing first creates a fold that moves while you sew.
- Using thread that is too dark or too thick makes the stitch easier to spot.
- Pulling the thread tight causes puckering along the hem edge.
- Taking too large a bite shows the stitch on the right side.
- Using the wrong finish on stretch fabric leads to tunnelling or broken stitches.
- Skipping a test scrap means the first attempt is happening on the actual garment.
The cleanest fix is usually boring, but it works: slow down, press again, and sew a short sample before touching the real hem. On troublesome fabric, I change one variable at a time rather than guessing. That approach is slower in the moment and much faster overall, because it stops me from unpicking a whole round of stitching. Once those mistakes are out of the way, it becomes easier to see when a different finish is the better call.
When another hem finish is the better choice
Not every garment wants a blind hem, and I think that is worth saying plainly. If the fabric is very sheer, a rolled hem may look lighter and more deliberate. If the garment is knit and needs stretch, a stretch hem or twin needle finish may be more reliable than a standard blind stitch. If the hem is meant to be decorative, topstitching may be the right design decision rather than a hidden one.
I also change course when the garment is too bulky at the fold. Thick wool coats, heavily lined hems, or fabrics with a lot of structure can look clumsy if you force a hidden hem where there is not enough room for it. In those cases, reducing bulk, grading seam allowances, or choosing a different finish usually gives a better result than insisting on invisibility.
What I want is not a blind hem at any cost. I want the finish that suits the fabric, the garment, and the way it will be worn. That judgment is what makes the work look considered rather than merely technically correct. The last step is learning the small details that push a good hem into polished territory.
The small details that make the finish look bespoke
The difference between acceptable and excellent is usually hidden in the details. I always match the thread as closely as possible, trim loose fibres before I turn the hem, and give the finished edge a proper press from the inside and outside. On fine fabrics, I keep the stitches slightly looser than I think I need, because a hem that is too tight often shows itself later as a ripple.
If I am working on a garment that matters, I also check the hem in daylight from different angles. Side light reveals things overhead lighting hides, especially on dark cloth. That final check is quick, but it catches the issues that make a handmade hem look homemade in the wrong way. And that is the real goal here: a finish that disappears because the technique, the fabric, and the pressing all agree with one another.
When I use a blind hem well, the result is simple and quiet, which is exactly what good tailoring should be. The stitches hold the edge securely, the outside stays smooth, and the garment keeps its shape instead of announcing how it was finished. If you remember one thing, remember this: the hem disappears when the fold is accurate, the bite is tiny, and the pressing is done before you judge the result.
