
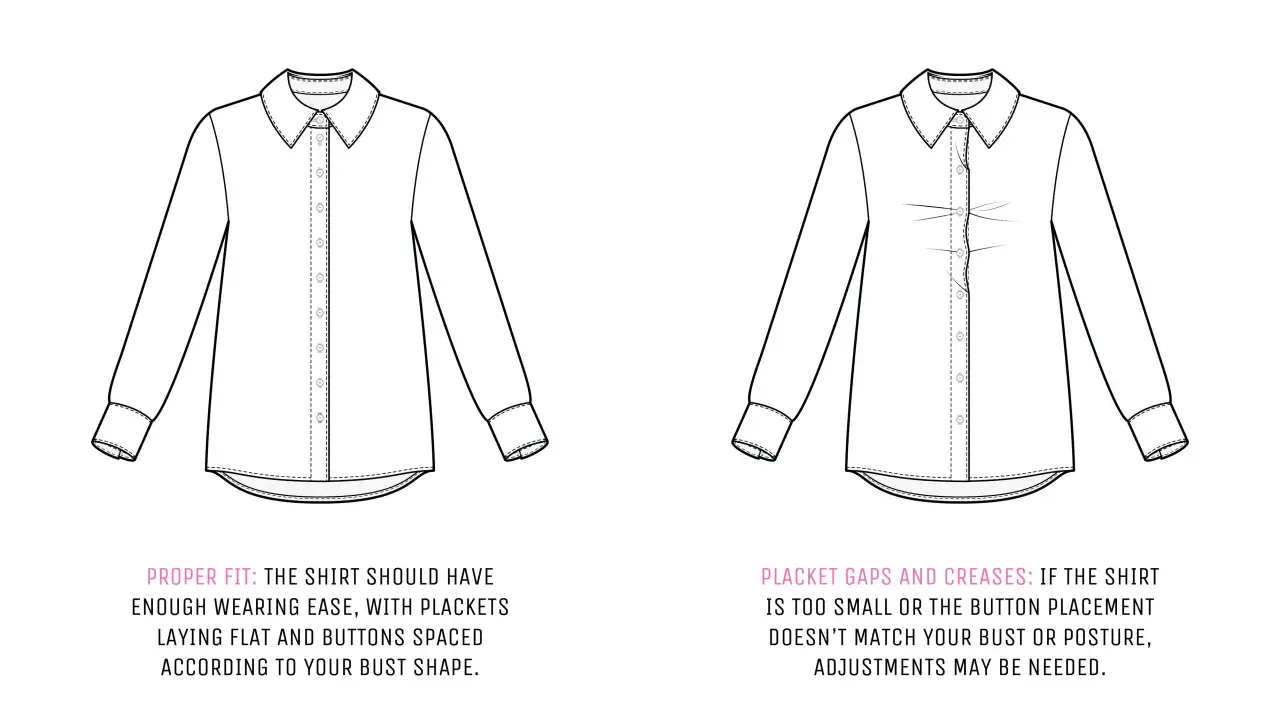
A clean closure can make a handmade shirt look precise; a messy one makes even good fabric feel unfinished. In sewing, a button placket is the reinforced strip or opening that holds the buttons, keeps the front stable, and lets the garment sit flat under strain. This guide explains what it does, which construction to choose, how I sew it cleanly, and the small checks that prevent gaping, bulk, and wavy edges.
What matters most before you cut the opening
- Support matters as much as shape. The closure needs interfacing and careful pressing, not just neat stitching.
- Choose the simplest construction that suits the fabric. Light cottons, crisp shirting, and drapey cloth all behave differently.
- Button placement affects fit. If the spacing is wrong, the front will pull no matter how tidy the sewing looks.
- Test buttonholes on scrap first. The right length depends on the button’s width and thickness, plus the fabric weight.
- Most beginner problems come from rushing the finish. Pressing, trimming, and stabilising are what make the result look intentional.
What a placket does and why it matters
I think of the placket as a small engineering zone in a garment. It is the part that absorbs repeated strain, defines the opening, and gives the buttons something stable to anchor into. On shirts and dresses, it may be a separate strip, a folded extension of the front, or a concealed finish that hides the fastening almost completely.
It is also easy to confuse a placket with a facing, but they do slightly different jobs. A facing finishes an edge on the inside; the placket creates or reinforces the opening itself and usually carries the buttons or buttonholes. That distinction matters because a front that looks neat but has no structural support will often ripple, gape, or twist after a few wears.
Once you understand that difference, the next question is not how to copy a pattern detail, but which construction will actually suit the garment you are making.
Which construction suits the garment best
There is no single best version. I choose the one that matches the fabric, the style, and how much bulk I can tolerate at the opening. A dense fabric needs a different solution from a fine blouse cloth, and a dressy front needs a cleaner finish than a casual overshirt.
| Style | Best for | Why I use it | Trade-off |
|---|---|---|---|
| Cut-on or folded extension | Simple tops, lighter cottons, beginner patterns | Quick to sew and low in bulk | Can look less crisp on very soft or slippery fabric |
| Separate button band | Shirts, shirt dresses, structured woven garments | Gives a sharp edge and strong support for buttonholes | Adds another seam line and needs careful pressing |
| Concealed front closure | Dressier blouses, prints, minimalist styles | Keeps the front visually clean | More exacting to sew and easier to misalign |
| Faux placket | Decorative tops and garments that do not need full opening | Gives the look without the fastening work | Not functional, so it will not help you get dressed |
| Split placket | Some necklines, jersey tops, casual shirts | Reduces bulk and allows a neat opening in a small area | Needs accurate matching where the pieces meet |
If I am unsure, I follow the pattern first and modify only when the fabric clearly demands it. That keeps the closure looking like part of the garment rather than an afterthought, and it leads naturally into the sewing sequence itself.
How I sew a neat front closure
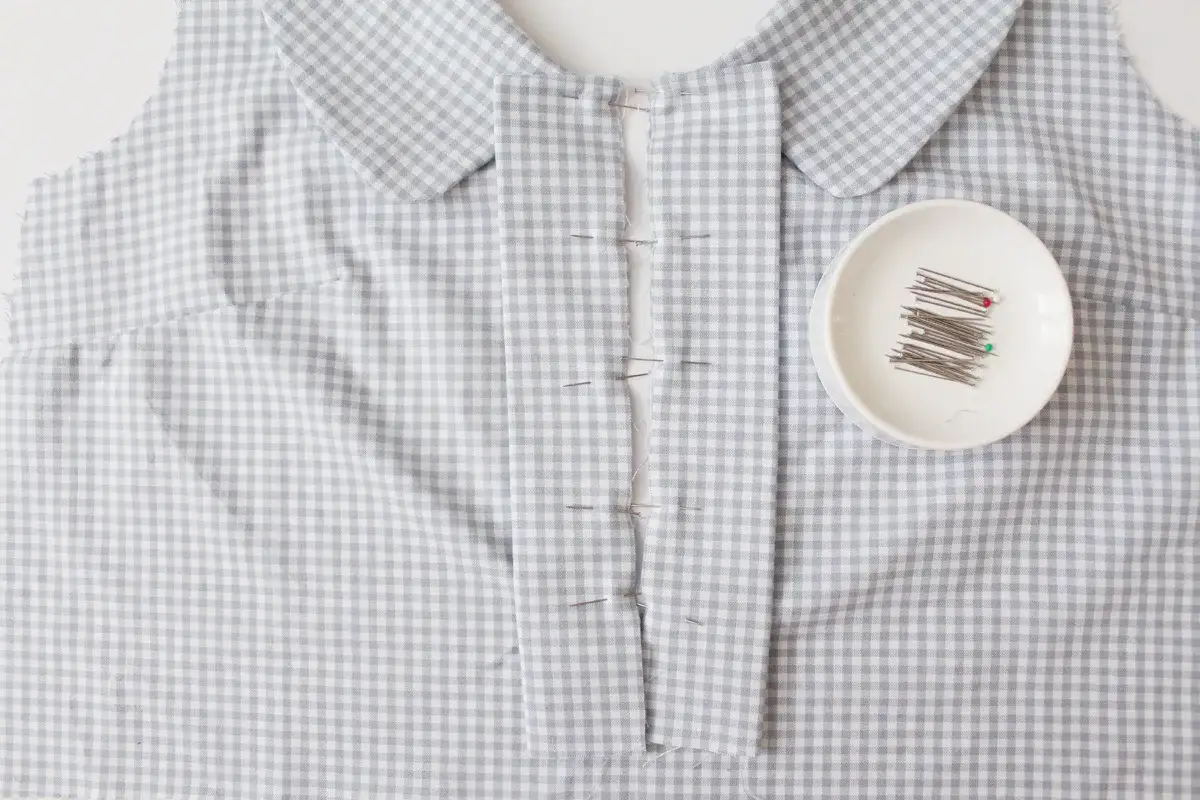
I start with the opening, not the buttons. Before any stitching, I mark centre front, the finished fold line, and the exact button placement on the right side of the garment. If the pattern includes a seam allowance of 10-15 mm, I keep to that and do not improvise a narrower edge just because it looks tidy on the table.
Mark and stabilise first
The wrong side of the placket gets interfaced before I sew anything visible. For lightweight cotton or viscose, I usually reach for a lightweight woven fusible; for a more structured shirt cloth, I stay with something that supports the edge without turning it cardboard-stiff. I like the interfacing strip to extend just beyond the finished fold so the edge does not collapse where the buttons will pull.
Accuracy matters here more than speed. If the strip is crooked, the finished front will show it. If the interfacing is too heavy, the placket will stand away from the body instead of lying flat.
Sew, trim, and press in sequence
Once the layers are stitched, I trim and grade the seam allowances so the bulk does not build up at the fold. Understitching means stitching the seam allowance to the facing so the seam rolls to the inside instead of sneaking to the outside, and it is one of the simplest ways to get a crisp edge. I use it whenever the construction allows it, because it stops the inside from fighting the outside.
Pressing is not a final touch; it is part of the construction. I press after every major seam, often using steam first and then a clapper or a dry press to set the edge. If the fabric is still wavy after pressing, I stop and fix the problem before moving on. More topstitching will not rescue a distorted fold.
Read Also: Perfect Side Seams - Sew, Finish, and Fix Fit Issues
Add buttonholes and buttons at the end
I never trust a buttonhole length until I have tested it on scrap. A good rule is to measure the button’s widest point and add a little extra for its thickness, then test it against the actual fabric. On thicker cloth, I often use a small thread shank behind the button so it sits comfortably rather than being forced tight against the placket.
For the buttons themselves, I prefer to fit them to the garment, not the other way round. A beautifully sewn button that sits in the wrong place still produces a bad closure, so the fastening only gets attached once the front has been tried on and checked in motion.
That practical sequence works even better when the fabric and interfacing are chosen with the same level of care.
Fabric and interfacing choices that change the result
Fabric weight and fibre content affect the closure more than most beginners expect. A softly draping cloth wants support without stiffness, while a crisp shirting needs enough structure to keep the edge square. If I ignore that balance, I usually end up fighting ripples or bulk.
| Fabric type | What I usually use | Why it works |
|---|---|---|
| Cotton lawn, viscose, rayon | Lightweight woven fusible | Gives stability without making the front feel heavy |
| Poplin, chambray, shirting cotton | Light to medium woven fusible | Helps the edge stay crisp and keeps buttonholes from stretching out |
| Denim, twill, canvas | Tailored fusible or a lighter support on the placket layer only | Controls bulk while still giving enough firmness for repeated fastening |
| Knits and jersey | Knit fusible or stay tape, if the pattern calls for it | Stabilises the opening without making the fabric rigid |
When a fabric frays badly, I finish the raw edge before I fold anything into place. When it stretches on the bias, I stabilise more aggressively. And when the cloth is bulky, I keep the interfacing one step lighter than I first think I need, because too much structure can be worse than too little. That leads straight into the placement decisions that decide whether the front closes comfortably.
How to place buttons so the front actually closes
Button placement is where aesthetics and fit meet. Even the cleanest placket will fail if the buttons sit too far apart or too close to a strain point. On a typical shirt front, I often work with spacing around 7-9 cm, then tighten it to 5-6 cm wherever the body creates more tension, such as across the bust or over a rounded stomach.
I check the top fastening first, because that one controls how the neckline sits. If it is too low, the front opens too much; if it is too high, the garment can feel restrictive. I then make sure the lowest fastening stops the hem from flipping open when the wearer moves, sits, or reaches forward.
When I am unsure, I baste the front closed on a calico toile and make the wearer move in it. Sitting down, bending, and raising the arms tells me more than a flat pattern ever will. If the fabric pulls apart, I change the spacing before I sew the real buttons.
After that, the final quality check is not decorative at all. It is about whether the closure survives actual use.
The mistakes I check before I sew the final button
Most placket problems are predictable. I see the same few issues again and again, and almost all of them come from skipping one of the boring steps that makes the construction stable.
- Skipping interfacing. The edge may look fine at first, then stretch out and wave after a few wears.
- Cutting off grain. A slightly crooked opening is enough to make the whole front look twisted.
- Pressing too late. If you wait until the end, you lock in every small ripple instead of removing it.
- Choosing the wrong spacing. Pretty symmetry matters less than functional ease across the body.
- Ignoring bulk at the seam intersections. If the corners are thick, the placket will not lie flat and the buttons will sit awkwardly.
- Sewing buttonholes before a fit check. Once they are cut, you have committed to the placement.
My own rule is simple: if I am hesitating about any of those points, I stop and test the garment again before the buttons go on. That extra pause usually saves more time than it costs.
What makes the finish look properly made
The best-looking closure is rarely the one with the most steps. It is the one where every step was done in the right order, with the right amount of support, and with enough pressing to make the layers behave. I would rather sew a plain, well-supported placket than a complicated one that twists under its own weight.
If you want the result to look polished, keep three habits consistent: stabilise before you stitch, press after every meaningful seam, and place the buttons for the body that will wear the garment, not just for the pattern piece on the table. Those are the details that make the opening lie flat, close smoothly, and keep its shape over time.
That is the difference between a closure that merely works and one that makes the whole garment feel finished.
