
The curved seam rules that save the most time
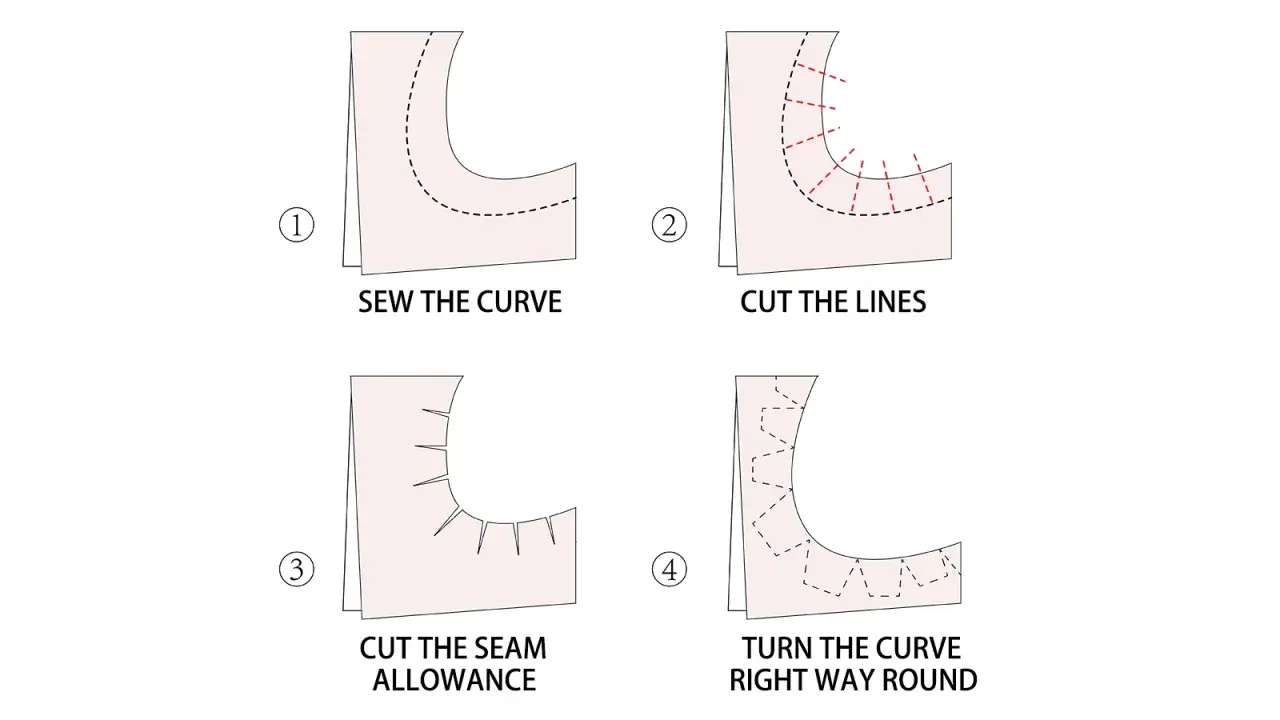
- Concave curves usually need clipping so the seam allowance can spread.
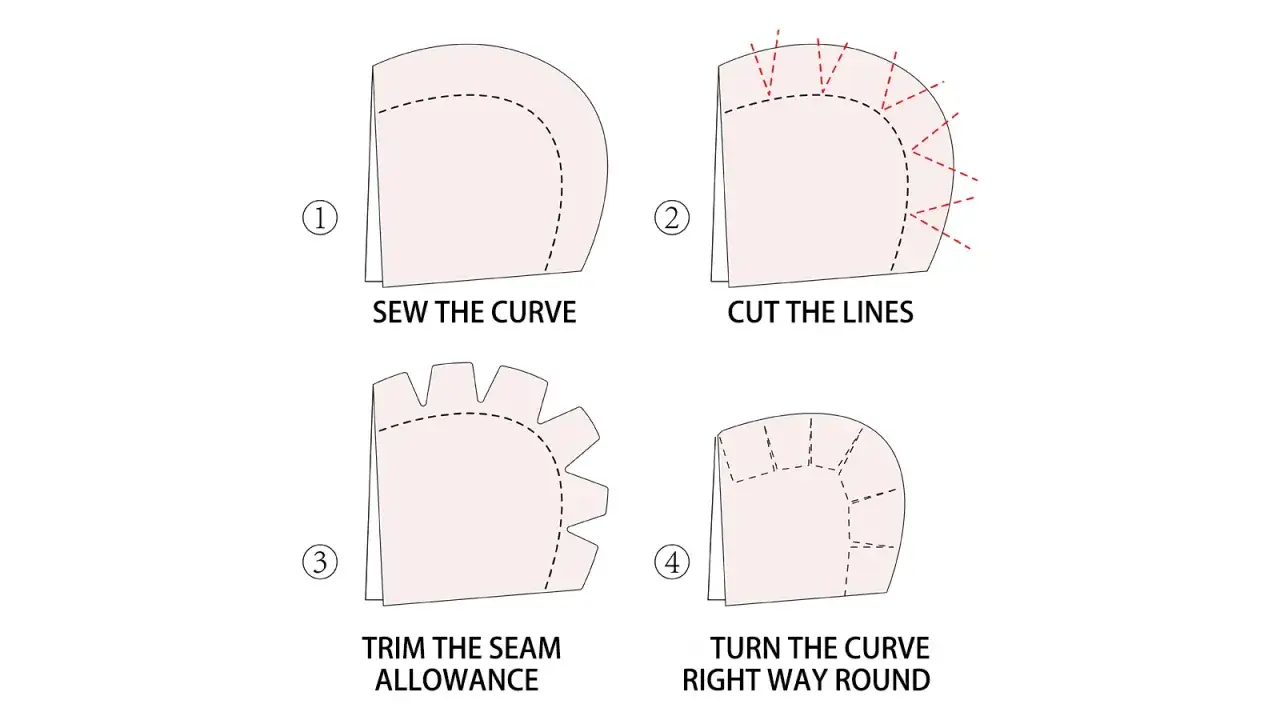
- Convex curves usually need notching or careful trimming to remove bulk.
- Keep the cuts close to the stitch line, but never cut through it.
- The tighter the curve, the more often you need small, even clips.
- Grading, understitching, and pressing often matter just as much as the cuts themselves.
- If the seam still ripples after clipping, the issue is often stitch accuracy or excess bulk, not the technique itself.
What clipping curved seam allowances actually solves
Curved seams do not behave like straight seams. The inside of a curve is shorter than the outside, so the seam allowance has to redistribute itself after stitching. If it cannot, the fabric fights the shape: a neckline puckers, an armhole pulls, or a facing rolls where it should lie cleanly against the garment.
That is why I treat clipping as a tension-release step. The cut is not there to weaken the garment; it is there to let the fabric open out and match the shape it has been sewn into. On a concave curve, the raw edge wants to bunch. On a convex curve, the seam allowance wants to stack up and create bulk. The fix depends on which way the curve bends, and that is where many beginners mix things up.
Once you understand that, the rest of the process becomes easier to judge by eye. You stop clipping everything automatically and start asking what the seam allowance needs in that one spot. That leads neatly into the difference between clipping, notching, and grading.
Clipping, notching, and grading are not the same thing
These three techniques are related, but they solve slightly different problems. I use them together when a curved seam needs both shape and reduced bulk.
| Technique | What it does | Best used on | Practical note |
|---|---|---|---|
| Clipping | Makes straight cuts into the seam allowance to release tension | Concave curves such as necklines, armholes, and inward-facing edges | Cut close to the stitch line without cutting through it |
| Notching | Removes tiny wedges of seam allowance to reduce bulk | Convex curves such as rounded hems, princess seams, and outward curves | The more curved the edge, the more useful notching becomes |
| Grading | Trims seam allowances to different widths so they do not stack up | Multi-layer seams, facings, linings, and bulky woven fabrics | Often reduces the need for aggressive clipping |
In practice, I think of grading as the bulk reducer, clipping as the curve releaser, and notching as the tidy way to remove excess from an outward curve. If you remember that distinction, you will make better choices at the machine and at the ironing board. Next, it helps to look at the actual hand movement, because most curve problems come from being too heavy-handed with the scissors.
How I clip a curve so it lies flat
The safest way to clip a curve is slowly and in small steps. I do not try to solve the whole seam with one dramatic cut, because that is how stitches get nicked and edges become fragile.
- Sew the seam accurately first. If the stitch line wanders, clipping will not fix the shape.
- Press the seam as sewn so the stitching settles before you start cutting.
- Decide whether the curve is concave or convex. That tells you whether to clip or notch.
- Use sharp small scissors or snips and make evenly spaced cuts.
- Stop about 1 to 2 mm before the stitch line. That tiny margin matters.
- Turn or press the seam open and check whether the curve now lies naturally.
For concave curves, I make straight clips toward the stitching line. For convex curves, I remove tiny wedges instead of straight snips, because wedges take out bulk without creating little points that press awkwardly. If the curve is very tight, I make the cuts closer together rather than deeper. That keeps the seam flexible without putting stress on the stitching.
A tailor's ham or seam roll helps here, especially on necklines and armholes. Pressing a curved seam on a flat ironing board often exaggerates the shape instead of smoothing it. Once the cuts are in place, heat and pressure do the finishing work. The next question is how close together those cuts should be, because the answer changes with the fabric and the curve itself.
How far apart the cuts should be depends on the curve and the fabric
There is no single spacing that suits every project. A gentle curve in a stable cotton can tolerate wider spacing, while a tight neckline in a slippery viscose or bulky wool needs more frequent relief cuts. I usually start from the shape first and the fabric second.
| Curve and fabric situation | Good starting spacing | What to watch for |
|---|---|---|
| Gentle concave curve in a medium-weight woven | About every 1 to 1.5 cm | The seam should spread without looking frayed or overcut |
| Tight neckline or armhole | About every 6 to 8 mm | Use more clips, not deeper ones |
| Convex curve with visible bulk | Notches or graded sections every 8 to 12 mm | Reduce bulk before pressing so the edge does not look lumpy |
| Bulky fabric such as wool coating, denim, or quilted layers | Grade first, then clip or notch sparingly | Too many cuts can weaken the seam faster than they improve the shape |
As a rule, tighter curves need more frequent relief, while heavier fabrics need more bulk removed before pressing. If the seam allowance is very narrow to begin with, there may not be enough room to clip aggressively, and that is a sign to rely more on accurate stitching and grading. Once you have the shape under control, the finish details make the curve look intentional rather than merely functional.
What to combine with clipping for a cleaner finish
Clipping alone rarely gives the best result. It works best as part of a small sequence that manages both shape and bulk.
- Grade seam allowances when two or more layers will sit on top of each other. Trimming them to different widths stops a ridge from showing through.
- Understitch facings after clipping curved necklines or armholes. This keeps the facing from rolling to the outside.
- Press over a curved surface such as a ham or rolled towel. That helps the seam keep its natural arc.
- Finish raw edges only when needed. Hidden seams inside facings and linings often do not need extra bulk from overlocking or zigzagging.
- Stagger notches when several seam layers meet. If the cuts line up perfectly, they can leave a visible dimple.
My usual order is stitch, grade if necessary, clip or notch, then press, then understitch if the construction calls for it. That sequence keeps the seam allowance manageable instead of forcing one technique to do everything. The main thing to avoid is adding extra finishing before you have checked how the curve actually behaves, because that can make a clean edge feel thick and stubborn. From there, the most useful lesson is learning which mistakes cause trouble again and again.
The mistakes that turn a neat curve into a weak seam
The most common error is clipping too far. A cut that reaches the stitch line can open up later, especially on stress points such as armholes and pockets. The second mistake is clipping too far apart and expecting the fabric to magically flatten itself. On a tight curve, the seam allowance still needs enough release points to spread smoothly.
Another mistake is using the same treatment for every curve. A concave neckline and a convex princess seam are not asking for the same thing. If you clip both in the same way, one of them will usually misbehave. I also see beginners press before they have removed enough bulk, which just locks the problem in place. Once the seam has been flattened the wrong way, it often takes more work to correct.
Finally, do not confuse a bad stitch line with a bad curve. If your seam wobbles, clipping will not hide it. The fabric may still sit better after you release the allowance, but the edge will only look truly smooth if the seam was sewn cleanly in the first place. That is why the most reliable method is not a single trick, but a small routine you repeat every time.
The curved-seam routine I trust most on necklines, armholes, and facings
The method I come back to is straightforward: sew accurately, reduce bulk where needed, clip the concave side, notch the convex side only when the curve needs it, and press over a shape that matches the seam. That combination solves most problems without overhandling the fabric. It also keeps the seam strong enough for normal wear, which matters more than looking clever at the cutting stage.
If you work this way consistently, curved seams stop feeling mysterious. You start to recognise when a neckline needs a few extra clips, when a facing benefits from grading, and when the real answer is simply better pressing. That is the practical skill hidden inside clipping curves in sewing: knowing how little to do, and exactly when to do it.
For the best results, keep your scissors sharp, make your cuts small and even, and stop before the stitch line every time. The cleaner the original seam, the less correction you need afterwards, and the more likely your curves will lie flat with very little persuasion.
