
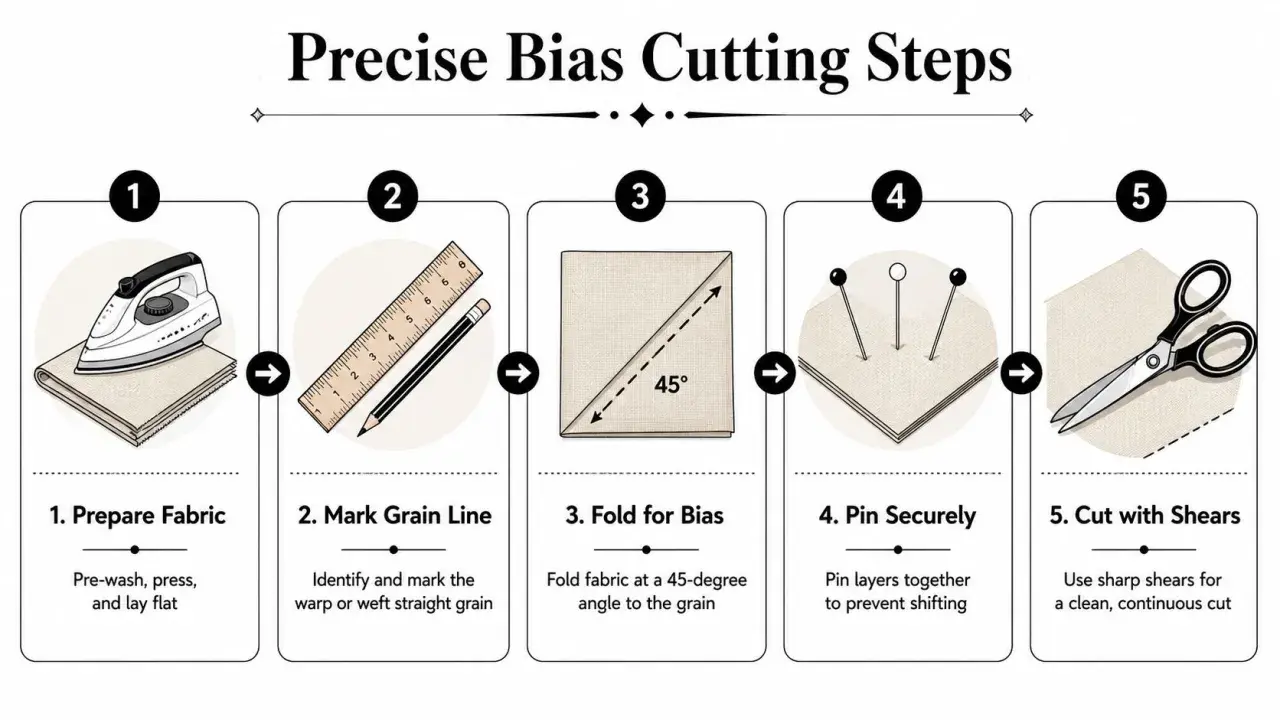
A bias cut changes how woven fabric hangs, stretches, and moves, which is why it can turn an ordinary cloth into something fluid and elegant. In practice, that means learning not just where to cut, but how to handle the fabric so the garment keeps its shape, fits well, and finishes cleanly. This guide walks through the logic behind the diagonal grain, the fabrics that behave best, and the sewing habits that make the biggest difference.
What matters most before you cut on the bias
- The true bias runs at 45 degrees to the lengthwise and crosswise grain, and that angle is what creates extra drape and give.
- Bias-cut pieces behave more like fabric with a soft memory than like rigid pattern pieces, so they need careful handling from the first cut.
- Lightweight wovens such as silk, viscose, rayon, and fine crepes usually perform best because they drape instead of fighting the body.
- Let bias garments rest for about 24 hours before final hemming so the fabric can settle and the hem can be levelled properly.
- Expect more waste, more movement during sewing, and a little more fitting sensitivity than with straight-grain garments.
- Use the technique when you want fluid shape and soft contour, not when you need crisp structure.
What the diagonal grain changes
Every woven fabric has a grain, and that grain controls how stable or flexible it feels. Along the lengthwise grain, the cloth is usually the most stable; across the fabric, it has a little more give; on the true bias, the yarns can slide against each other, which creates movement, drape, and a subtle stretch without turning the fabric into a knit. That is the real reason bias-cut garments skim the body instead of standing away from it.
I think of it as a trade-off. You gain softness, curve, and a beautiful fall, but you lose some of the control that makes straight-grain pieces easy to manage. That is why a simple silhouette can look expensive and fluid on the bias, while a very structured style can look saggy or unstable if it is cut the same way.
| Grain direction | How it behaves | Best use |
|---|---|---|
| Lengthwise grain | Most stable, least distortion | Tailored pieces, waistbands, trousers, structured bodices |
| Crosswise grain | Slightly softer than lengthwise grain | Some bodices, facings, pattern layout adjustments |
| True bias | Most fluid, most stretch, easiest to distort | Slip dresses, draped skirts, cowl necks, soft sleeves |
That difference in behaviour is the starting point for everything else, because once you understand how the grain moves, it becomes much easier to cut and sew without fighting the cloth.
How to cut and handle bias pieces without distorting them
Cutting on the true bias sounds simple, but the handling matters more than the angle itself. A piece can be perfectly marked and still end up warped if it is dragged, folded carelessly, or left hanging over the table edge while you work. When I cut on the bias, I treat the fabric like something that can be persuaded, not forced.
- Find the true bias by folding the selvedge to the cut edge so the fold makes a right angle; that fold line gives you the 45-degree direction.
- Lay the fabric flat on a large, stable surface. If the fabric is slippery, single-layer cutting is often safer than folding it double.
- Use pattern weights and a sharp rotary cutter or fine shears. Heavy handling is what starts the distortion.
- Mark notches and grainlines clearly, but keep the markings light. Too much chalk, pressure, or rubbing can stretch delicate cloth.
- Move each cut piece with support under it, not by letting it dangle from one corner.
- After sewing, let the garment hang for about 24 hours before hemming so the bias can settle to its natural length.
If you are making a skirt, dress, or sleeve, that last step is not optional in my view. The fabric often grows unevenly once gravity has had time to do its work, and if you hem too early, you are almost guaranteed to spend more time correcting the line later. That leads straight into the next question: which fabrics actually reward this method instead of punishing it?
Fabrics that behave beautifully on the bias
Some fabrics come alive on the diagonal, while others become unruly or too heavy. In general, you want a woven cloth that is light enough to fall softly but stable enough to keep its shape during sewing. Very crisp or bulky fabrics usually resist the effect rather than enhancing it.
| Fabric | Why it works | What to watch for |
|---|---|---|
| Silk satin | Glossy, fluid, and ideal for classic drape | Slippery surface; cut carefully and use a fine needle |
| Silk crepe de chine | Soft movement with less shine than satin | Can distort if overhandled |
| Viscose or rayon challis | Excellent fall and a soft hand | Check shrinkage before cutting |
| Viscose or rayon crepe | Elegant drape with more body than challis | Edges can grow while sewing if handled roughly |
| Lightweight wool crepe | Gives soft structure and a refined silhouette | Heavier versions can become bulky on curves |
| Cotton lawn or voile | Light, breathable, and good for softer bias shapes | Less dramatic drape than silk or viscose |
I would usually avoid very heavy denim, thick canvas, or stiff upholstery-type weaves for this technique. They do not drape well on the diagonal, and the result often feels clumsy rather than elegant. If you want visible softness, the cloth has to be able to fall.
Why bias garments need different sewing and fitting habits
Once the pieces are cut, the sewing strategy changes too. A bias garment does not respond well to rough stitching, aggressive pressing, or constant unpicking. It needs a steadier rhythm and more attention to the fabric’s behaviour while you sew.
These are the habits I rely on most:
- Staystitch curved or unstable edges early. Staystitching is a line of stitching just inside the seam allowance that keeps a cut edge from growing while you handle it.
- Use a fine needle. For lightweight woven fabrics, a 60/8 or 70/10 needle often gives cleaner results than a heavier size.
- Shorten the stitch slightly. A length around 2.0 to 2.5 mm usually gives more control without making the seam stiff.
- Feed the fabric gently. Let the machine move it rather than pulling from the front or back.
- Press, do not drag. Lift the iron, place it, and use heat and steam with care so the seam does not stretch out of line.
- Check fit after the garment has relaxed. Bias pieces can settle differently on a body or dress form than they looked on the cutting table.
Common mistakes and where the fabric can misbehave
Most problems come from impatience or from treating the cloth as if it were cut on the straight grain. The technique itself is not difficult, but it punishes shortcuts. I see the same errors again and again, and most of them are easy to avoid once you know what to look for.
| Mistake | What goes wrong | Better approach |
|---|---|---|
| Cutting in a hurry | Edges shift and the garment loses symmetry | Support the fabric fully and cut in a calm, controlled way |
| Hanging pieces over the table edge | The weight stretches the cloth before sewing begins | Keep every piece flat and supported |
| Skipping staystitching | Necklines, armholes, and curved seams grow out of shape | Stabilise vulnerable edges as soon as they are cut |
| Hemming too early | The finished hem becomes uneven after the garment drops | Let the piece rest for about 24 hours, then level the hem |
| Choosing a fabric with too much structure | The bias effect barely shows, or the garment feels awkward | Choose a fabric with fluid drape and enough softness to move |
| Trying to use bias for everything | Tailored pieces lose stability and become harder to fit | Reserve it for styles that benefit from softness and contour |
There is one more subtle issue worth naming: prints and stripes can look spectacular on the diagonal, but they can also make sewing more demanding. A chevron effect can be beautiful, yet it leaves no room for sloppy alignment. If the fabric already has a strong direction, I plan the layout first and cut only when I know exactly where the visual line is going.
A simple checklist I trust before starting the next project
When I want a bias garment to work, I keep the process deliberately simple. That helps me stay focused on what actually changes the result instead of chasing tiny fixes later.
- Choose a fabric with visible drape and enough lightness to fall softly.
- Check that the pattern suits fluid movement rather than sharp structure.
- Mark the true bias clearly before cutting any major piece.
- Cut with full support under the fabric, not with pieces dangling off the table.
- Staystitch any edge that could grow while you sew.
- Let the garment hang before hemming, then level the hem after it has settled.
If you are starting out, a simple skirt, cami, or sleeveless dress is usually the most honest place to begin. Those shapes show you what the diagonal grain can do without asking you to manage too many seams at once, and that is where the technique becomes genuinely satisfying. A well-made bias-cut piece should feel like the fabric is moving with the body, not sitting on top of it.
