

Thread balance is one of those small machine settings that can quietly decide whether a seam looks crisp or fights you all the way across the fabric. When the top thread and bobbin thread work together, stitches sit neatly in the middle; when they do not, you get puckers, loops, loose seams, or the kind of finish that sends you straight for the seam ripper. This article breaks down what the setting actually controls, how to read the stitch, and the safest way to adjust it without chasing the wrong problem.
The quickest route to a balanced stitch
- Start with threading, the needle, the bobbin, and lint before touching the dial.
- A mid-range setting around 3 to 5 is a sensible starting point on many domestic machines.
- Visible bobbin thread on the front usually points to a top-thread problem, not a broken seam.
- Fabric weight, thread thickness, and stitch type can all change the ideal setting.
- Bobbin adjustment exists, but it is usually not the first thing I reach for.
- Test on the same fabric layers you plan to sew, not on a single scrap that behaves differently.
What balanced stitching should look like
On a well-balanced straight stitch, the threads lock in the middle of the fabric layers. On the right side, you should mostly see the top thread; on the wrong side, the bobbin thread should dominate. The goal is not a laboratory-perfect line through every fibre, but a seam that lies flat, feels even to the touch, and still looks tidy after pressing.
I think of thread balance as a fine-tuning tool, not a rescue switch. If the seam changes after you switch thread, move from cotton to jersey, or stack several layers, yesterday’s setting may no longer be the right one. That is normal, and it is exactly why a test seam belongs in the process rather than at the end of it.
Once you know what “right” looks like, the fabric itself starts telling you when you are off course.
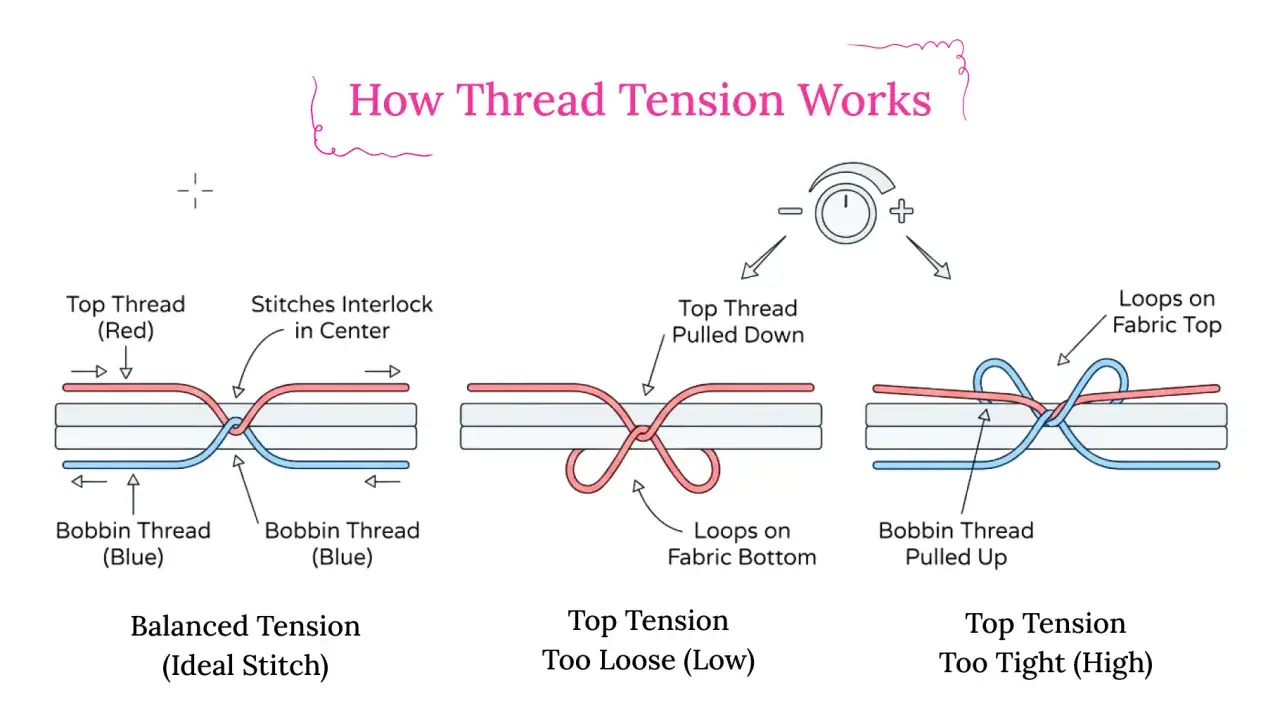
The stitch clues that tell you what is wrong
The seam usually gives you a clearer diagnosis than the dial does. I pay attention to where the thread shows, whether the fabric is puckering, and whether the problem is constant or only appears after a few stitches. Those clues usually narrow the cause much faster than random adjustments.
| What you see | What it usually means | What to try first |
|---|---|---|
| Bobbin thread shows on the right side of the fabric | The top thread is usually too tight, or the upper thread path is not seated correctly. | Rethread the top with the presser foot up, then loosen the upper setting one small step. |
| Top thread appears in loose loops on the underside | The upper thread is usually too loose, or it missed a guide or the take-up lever. | Rethread the top path carefully, then tighten the upper setting one small step. |
| Puckering or tunnelling along the seam | The setting is too tight for the fabric, or the needle/thread combination is working against you. | Loosen slightly, check the needle size, and sew a longer test seam on scrap. |
| Stitches start cleanly and then drift off | Lint, a damaged needle, a snagged spool, or an inconsistent feed path is often involved. | Change the needle, clean the bobbin area, and test again before making bigger changes. |
If the symptom changes when you swap thread brands, that is a useful clue too. Some threads behave smoothly through the machine; others create extra drag and make a perfectly good setting look wrong.
Once the stitch gives you a pattern, the adjustment itself becomes much less mysterious.
How I would adjust the machine step by step
The safest routine is boring, and that is exactly why it works. I start with the thread path, the needle, the bobbin, and the fabric sample before I touch the dial; only after that do I make one small change, sew again, and compare.
- Raise the presser foot and rethread the upper path so the thread can sit properly in the tension discs.
- Check that the thread passes through every guide and through the take-up lever.
- Insert a fresh needle that suits the fabric and thread weight.
- Confirm that the bobbin is wound smoothly and seated in the correct direction.
- Set the dial to a middle starting point, usually around 3 to 5 on many domestic machines.
- Sew a test seam on the same number of layers you plan to use in the real project.
- Change the setting one small step at a time, then test again.
On most machines, turning the upper dial to the right tightens the stitch and turning it to the left loosens it. I avoid big jumps because they make it hard to tell whether the result came from the setting, the thread path, or a separate mistake you have not noticed yet. If your machine has an AUTO setting, treat it as a starting point rather than a promise.
That process sounds slow, but in practice it saves time because it stops you from chasing the wrong fault.
Straight stitch, zigzag, and decorative stitches do not want the same balance
Different stitches put different demands on the thread. A straight stitch is the easiest place to judge balance, because the thread runs in a simple line. Zigzag, stretch, and decorative stitches move the thread side to side, so they often need a slightly different setting to look and feel right.
| Stitch type | What I usually do | Why it helps |
|---|---|---|
| Straight stitch | Use it as the baseline and adjust from a middle setting. | It is the clearest reference point for checking balance. |
| Zigzag stitch | Try a slightly looser upper setting than for straight stitching. | The thread needs room to travel side to side without pulling the fabric tight. |
| Stretch or jersey stitch | Keep the upper setting modest and use the correct needle for knits. | Too much pull can flatten the stretch and distort the seam. |
| Decorative or topstitching thread | Test more carefully and expect to fine-tune the top thread. | Thicker thread creates more friction and shows small balance changes quickly. |
| Fine silk or viscose fabrics | Use a lighter touch on the upper tension and a finer needle. | These fabrics mark and pucker easily if the machine pulls too hard. |
For woven cotton, a universal 80/12 needle and all-purpose polyester thread are a dependable starting point. For knits, I reach for a ballpoint or stretch needle and keep the upper thread a little less aggressive. For denim or canvas, a stronger needle and slower stitching often matter more than chasing a dramatic tension change.
The important thing is not memorising one magic number. It is recognising that stitch type, fabric structure, and thread thickness all change the way the machine behaves.
Once you start matching the setting to the stitch type, the bobbin becomes the next place worth checking carefully.
When the bobbin, not the dial, is the real problem
Many tension complaints are really bobbin complaints in disguise. A bobbin wound unevenly, inserted the wrong way, or sitting in a lint-filled case can make the top thread look guilty when it is only reacting to a deeper issue. That is why I nearly always rule out threading and needle problems before I touch any bobbin adjustment screw.
The bobbin is a smaller, more sensitive part of the system, so I treat it with more caution. On machines where the bobbin case is user-adjustable, a tiny screw turn can make a difference; on others, that screw is better left alone unless the manual specifically says otherwise. If a machine was sewing well yesterday and now suddenly behaves badly, a dirty bobbin area is much more likely than a mysterious setting drift.
Here is the order I use when I suspect the bobbin side:
- Check that the bobbin is wound evenly and not overfilled.
- Make sure the bobbin sits in the correct direction for the machine.
- Remove lint and thread fragments from the bobbin case and surrounding area.
- Try a fresh bobbin, because old or damaged ones can feed unevenly.
- Only then consider a bobbin adjustment, and only if the machine is designed for it.
That sequence is slower than turning every screw you can see, but it avoids creating a second problem while trying to solve the first.
How to keep the setting stable from one project to the next
The cleanest stitches usually come from consistent habits rather than constant adjustment. I change the needle regularly, keep the machine clean, and test with the same thread and fabric combination I plan to use for the actual seam. That alone prevents a surprising number of false tension problems.
There are a few habits I rely on every time:
- Raise the presser foot before threading the upper path.
- Change the needle when it looks dull, bent, or noisy in the fabric.
- Clear lint from the bobbin area before it starts affecting the stitch.
- Store thread away from dust and direct heat so it does not become brittle.
- Keep a note of the settings that work for your most common fabrics.
I also like to press the test seam before I judge it. Some fabrics look balanced straight off the machine but settle differently after steam or pressure from the iron. If the seam still looks wrong after two small adjustments, I stop and inspect the thread path again instead of making the dial my only suspect.
That final habit is the one that saves the most seam ripper work.
The habit I trust before I sew a real seam
Before I commit to the garment or project, I sew at least 15 to 20 cm on the actual fabric stack, not on a random offcut that behaves differently. I check both sides, press the sample, and compare it with the seam I want to achieve. If the stitch still looks slightly off, I make one more small adjustment and test again.
That routine is simple, but it does something important: it keeps the machine from becoming a guessing game. When the stitch is balanced, the sewing feels calmer, the seam lies flatter, and I can focus on the work itself instead of fighting the machine. If you build that habit into your process, tension stops being a mystery and becomes just another controllable part of sewing.
