
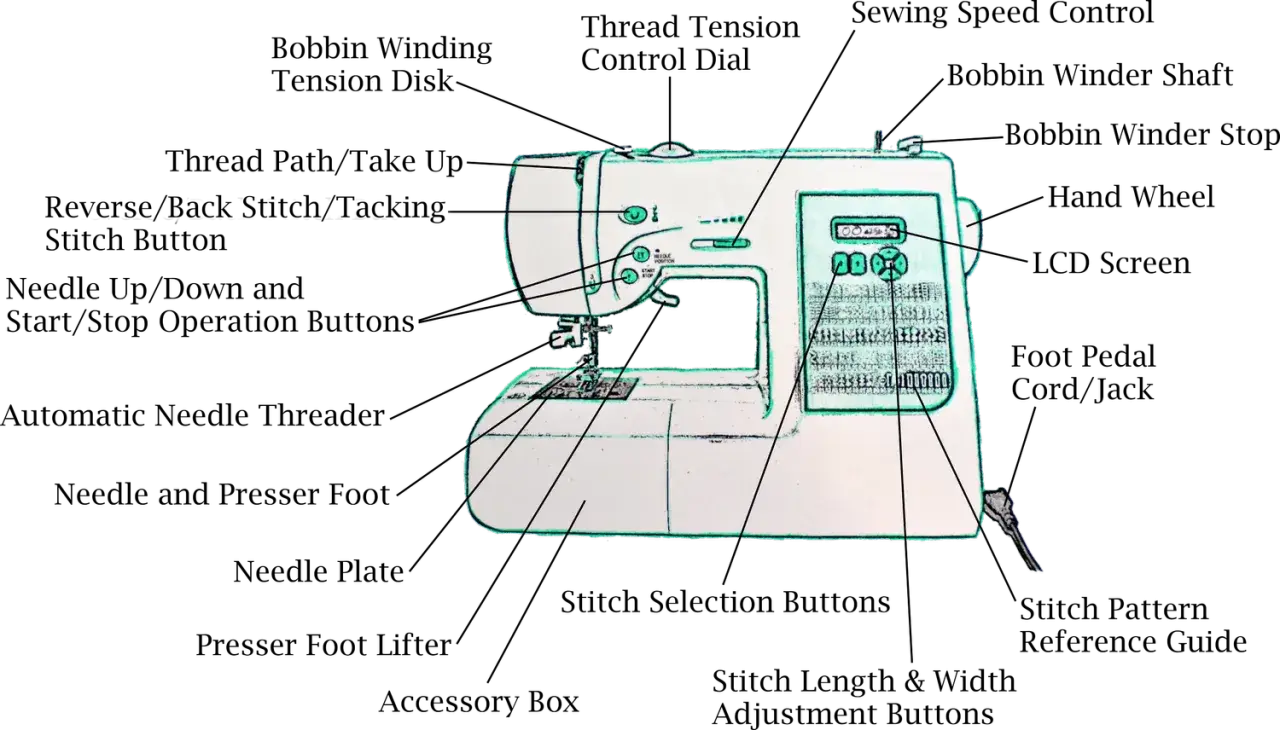
The parts that matter most are the ones that control thread, needle, and fabric movement
- The machine works as three linked systems: upper thread, lower thread, and fabric feed.
- Most stitch problems start in the needle area, the bobbin area, or the tension path.
- Not every dial changes the stitch itself; some controls manage speed, direction, or handling.
- Domestic, industrial, and overlocker machines share the same logic, but not the same layout.
- A symptom check usually tells you where to look before you change settings.
Why the layout matters more than the labels
I like to think of a sewing machine as a small mechanical conversation: one thread comes from above, one comes from below, and the feed system moves the fabric at the right pace so the stitch can lock neatly in the middle. If you only memorise names, the machine stays abstract; when you understand the job of each area, the whole process becomes easier to control. That is the real value of learning the parts and functions rather than treating them as isolated pieces.
The machine’s frame is usually described in three main sections: the head, where the working parts sit; the arm, which carries the upper mechanism; and the bed, which supports the fabric. On many domestic machines, the free arm is simply the narrower part exposed when you remove the accessory tray, and it becomes useful for sleeves, cuffs, and trouser hems. Once that structure makes sense, the upper thread path is the best place to start.
The upper thread path and what each control does
Thread tension is not magic; it is a controlled path. The spool pin feeds thread from the reel, thread guides keep it aligned, the tension discs add resistance, and the take-up lever pulls slack back out after each stitch. If one of those parts is skipped or threaded out of order, you usually do not get a broken machine so much as a messy stitch.
| Part | What it does | What goes wrong when it is ignored |
|---|---|---|
| Spool pin | Holds the thread reel and lets it feed smoothly | Thread jerks, snags, or unwinds unevenly |
| Thread guides | Keep the thread on the correct route | Skipped guides can cause weak tension or breakage |
| Tension discs | Add controlled drag to the upper thread | Too little drag gives loose loops; too much can snap thread |
| Take-up lever | Pulls slack back into the machine after each stitch | Stitches look uneven or thread forms slack underneath |
| Bobbin winder | Fills the bobbin before sewing starts | It does not affect stitching directly, but poor winding creates lower-thread problems |
I usually remind beginners that the threading order matters more than the number of markings on the machine. Even a modern computerised model still depends on the same basic thread path. Once the top thread is under control, the next place to inspect is the needle zone, because that is where the stitch is actually formed.
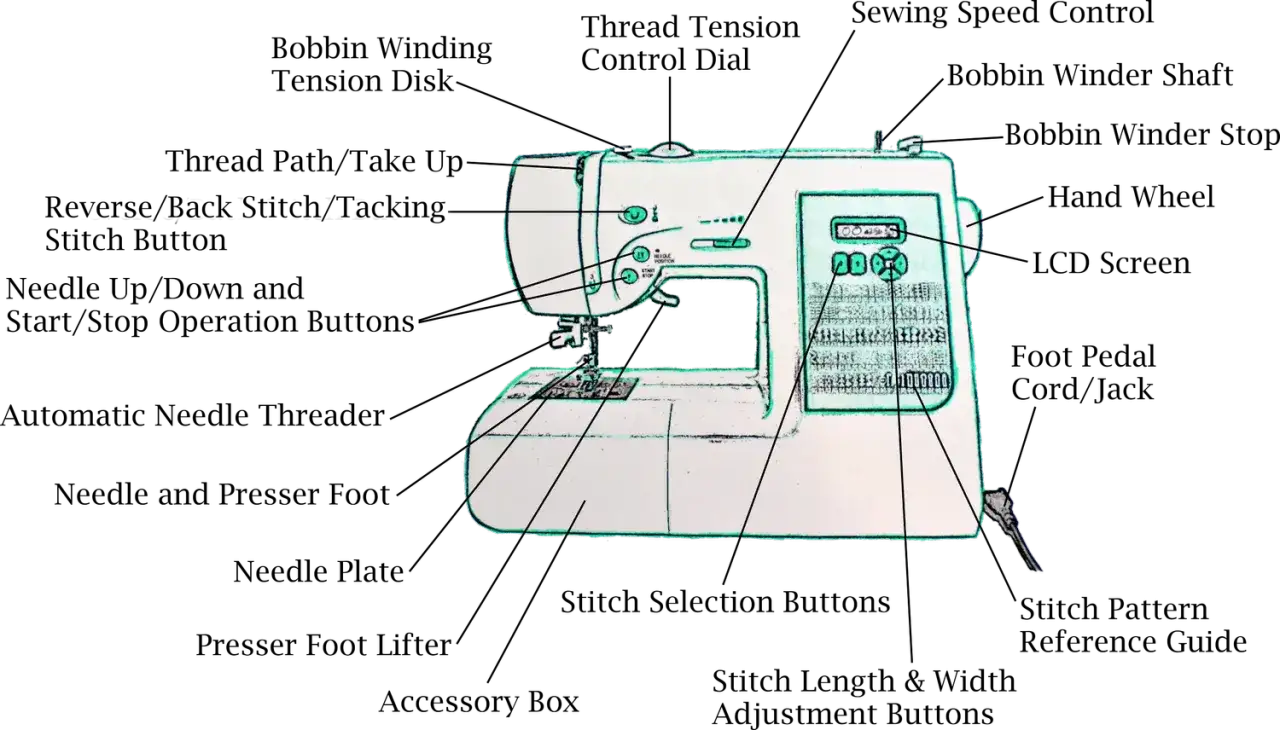
The needle area where the stitch is formed
This is the section beginners usually stare at first, and for good reason: most of the visible action happens here. The needle bar holds the needle and drives it up and down; the needle clamp keeps it secure; the presser foot presses the fabric flat; and the throat plate, often called the needle plate, gives the needle a precise opening to pass through. If the needle is bent, inserted backwards, or the wrong size for the fabric, stitch quality drops quickly.
I tell people to match the needle to the fabric before they reach for the tension dial. A 70/10 or 80/12 needle is usually suitable for lightweight cottons and fine dress fabrics, while a 90/14 or 100/16 needle is a better choice for denim, canvas, or several layers. A universal needle handles many woven fabrics, but a ballpoint or stretch needle is the safer choice for knits because it slides between the fibres instead of piercing them aggressively.
- The presser foot keeps the fabric flat and steady while the stitch forms.
- The presser-foot lifter raises the foot so you can place fabric and thread safely.
- The needle plate markings help you keep a consistent seam allowance; on many machines you will see common guides such as 1.5 cm or 5/8 in.
- The reverse lever is useful for locking a seam at the start and end, but it does not fix poor threading or the wrong needle.
That still leaves the hidden half of the stitch, which happens under the plate and is easy to forget until it goes wrong.
The hidden lower mechanism under the plate
Under the throat plate sits the bobbin system, and that is where the lower thread is stored and released. In a front-loading or top-loading machine, the bobbin sits in a bobbin case or directly in a drop-in housing; the hook or shuttle catches the upper-thread loop and pulls the two threads together to form a lockstitch. The practical point is simple: if lint, a damaged bobbin, or poor winding interrupts that loop, the machine cannot make a balanced stitch no matter how neat the top threading looks.
I clean this area more often than many beginners expect, because lint builds up quickly around cotton, fleece, towelling, and other fuzzy fabrics. A small brush and a careful look at the bobbin case usually solve more problems than people imagine. If the hand wheel suddenly feels stiff, I would stop and clear the hook area before forcing anything. Forcing the wheel can turn a minor jam into a damaged part.
- The bobbin holds the lower thread.
- The bobbin case keeps the bobbin in the right position and adds lower-thread tension on some machines.
- The hook or shuttle grabs the upper thread loop so the stitch can lock.
- The throat plate opening protects the needle and helps guide the stitch path.
Once the lower thread path is clean, fabric handling becomes the next variable, and that is where the feed system starts to matter.
How fabric actually moves through the machine
The feed dogs are the ridged teeth under the presser foot that move the fabric forward in tiny steps. Stitch length changes how far the fabric travels with each cycle, while presser-foot pressure helps keep lighter fabrics from skating and heavier fabrics from creeping unevenly. I always tell people not to push or pull the fabric; the machine is designed to do that work, and manual tugging is one of the quickest ways to distort a seam.
A common dressmaking seam allowance is 1.5 cm, or 5/8 in, so the markings on the throat plate are worth learning before you sew anything important. The feed dogs do the movement, the presser foot keeps the fabric stable, and your hands should only guide direction. If you need to sew a sleeve, cuff, or trouser hem, the free arm makes that easier because it reduces the fabric bulk around the needle area.
- Stitch length changes the spacing between stitches.
- Stitch width matters on zigzag and decorative stitches, but not on a plain straight stitch.
- Reverse locks a seam, usually with 3 to 4 backstitches at the start and end.
- Free arm helps with narrow tubular items.
Once you understand how the fabric is moved, the remaining question is how much of this anatomy stays the same across different machine types.
What changes across domestic, industrial, and overlocker machines
The core stitch logic stays the same, but the hardware around it changes. A domestic machine is built for versatility and convenience; an industrial machine is built for speed, consistency, and long hours of repeated work; and an overlocker, which is the common British term for a serger, trims and finishes seams differently from a lockstitch machine. I think this distinction matters because beginners often assume all machines should behave the same way.
| Machine type | What changes in the anatomy | Why it matters |
|---|---|---|
| Domestic machine | Compact body, one needle, bobbin system, selectable stitches | Best all-round choice for home sewing and mixed fabrics |
| Computerised domestic machine | Same core stitch path, but more electronic controls and stitch options | Makes precision easier, but the basic parts still need proper threading and cleaning |
| Industrial machine | Stronger motor, heavier frame, often fewer stitch types | Built for speed and durability, not convenience or portability |
| Overlocker | Loopers and knives replace the bobbin-and-hook setup used in lockstitch machines | Excellent for seam finishing, but it solves a different problem from a standard sewing machine |
Some industrial machines also add features like a knee lift, which raises the presser foot without taking your hands off the fabric. That sounds minor until you are trying to pivot a bulky seam or keep a precise corner in place. Once you know which type of machine you are looking at, it becomes easier to diagnose problems from the parts themselves.
How I diagnose problems from the parts themselves
When a machine misbehaves, I start with the simplest checks first: needle, threading, bobbin, lint, and fabric choice. That order saves time because the most common problems usually come from the easiest-to-miss parts. In practice, a machine rarely needs a dramatic repair for a stitch problem that began with a bent needle or a bobbin wound badly.
| Symptom | Likely area | First check |
|---|---|---|
| Skipped stitches | Needle zone | Replace the needle, then check that it is inserted fully and facing the correct way |
| Loops underneath the fabric | Upper thread path | Re-thread with the presser foot up so the thread can enter the tension discs properly |
| Thread nest under the fabric | Bobbin area | Check bobbin direction, bobbin case seating, and lint around the hook |
| Fabric will not feed evenly | Feed dogs and presser foot | Make sure the presser foot is lowered and the feed dogs are clean and raised |
| Thread keeps snapping | Needle and tension path | Check needle size, threading order, and any burr on the throat plate |
If the machine sounds rough, thumps, or resists the hand wheel, I stop sewing and look for jammed thread, lint build-up, or a needle strike before doing anything else. That simple habit protects the machine and usually gets the problem solved faster than random adjustment.
The quickest way to learn your own machine
When I teach someone a new machine, I do not start with every dial. I start with the five points that make the biggest difference: the needle, the presser foot, the bobbin area, the feed dogs, and the tension path. If you can find those five without hesitation, you can already solve most beginner problems on your own.
- Keep the needle type you use most often beside the machine and replace it before it dulls.
- Learn how to open the bobbin area and brush out lint safely.
- Check the throat plate markings before sewing a seam allowance.
- Test stitch length and tension on a scrap before every new fabric.
- Listen for changes in sound; a healthy machine should run evenly, not grind or thump.
Once you understand the machine’s anatomy, you stop treating it like a black box and start reading it like a tool: the needle tells you about the fabric, the bobbin tells you about balance, and the feed system tells you whether the seam will stay true. That kind of fluency saves time, prevents damage, and makes every project feel more controlled.
