
Denim looks simple from the outside, but the structure underneath is doing most of the work. A jean seam is part strength test, part bulk management, and part visual signature, which is why the same pair can feel rugged, polished, or sloppy depending on how the seams are built. In this guide I break down the main seam types used in jeans, where they belong, and how to sew or repair them without ending up with thick, puckered joins.
The seam decisions that matter most in denim
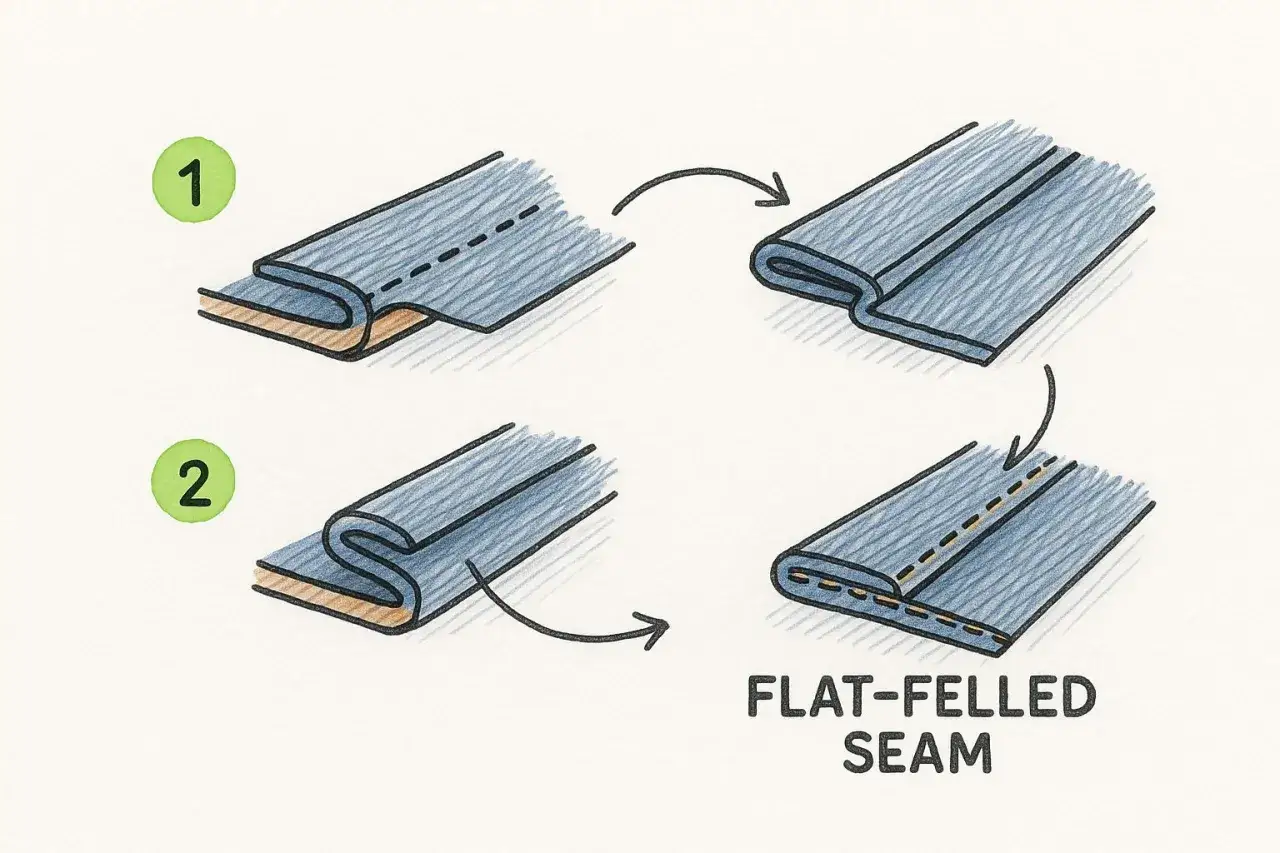
- Flat-felled seams are the classic choice for jeans because they enclose raw edges and handle abrasion well.
- Overlocked or plain seams are faster and thinner, but they are less traditional and usually less robust in high-wear zones.
- Chain stitching is most often used for hems and visible topstitching, not as the main structural seam.
- Inseams, outseams, crotch seams, yokes, and waistbands all face different stress, so they do not need the same finish.
- Needle choice, seam allowance, stitch length, and pressing matter just as much as the seam type itself.
What a denim seam has to survive
Denim is a working fabric, which means the seams are carrying more than a line of stitching. The inner thigh, crotch curve, pocket mouths, and waistband all move differently, so a seam has to resist abrasion, keep its shape after washing, and still sit flat enough not to chafe. That is why jeans construction is less about hiding stitches and more about controlling stress and bulk.
When I assess denim, I look at two things first: where the strain sits and how much fabric is meeting at that point. A strong seam is not automatically a bulky seam, and a neat seam is not automatically durable. The best denim work balances both, which is why the construction choices are so consistent from pair to pair.
That balance explains why denim relies on a small group of seam finishes rather than dozens of decorative options. Once you understand the job each seam has to do, the construction choices stop looking mysterious.
The seam constructions you will actually see in jeans
In practice, I keep seeing the same handful of seam families in jeans. Some are structural, some are finishing methods, and some are really reinforcement details that support the seam line rather than replacing it.
| Construction | Where it usually appears | Why it is used | Trade-off |
|---|---|---|---|
| Flat-felled seam | Inseams, outseams, yokes, and other hard-wearing joins | Encloses raw edges, resists abrasion, and gives the classic denim look | More bulk and more steps to sew |
| Plain seam with overlock finish | Pocket bags, waistband interiors, many fashion jeans | Fast, thin, and easy to sew on a home machine or in production | Less traditional and usually less abrasion-resistant |
| Lapped seam | Visible panel joins, decorative lines, some reinforced areas | Flat, clean, and useful when you want topstitching to show clearly | Can become bulky if several layers stack up |
| Chain-stitched hem | Jean hems and some visible topstitching | Durable, flexible, and responsible for the familiar roping effect after wear | Often needs a specialist machine or a denim repair service |
| Bartack reinforcement | Pocket corners, belt loops, fly ends | Locks down stress points so they do not tear open | Not a seam in the strict sense, only reinforcement stitching |
I would treat bartacks as part of the seam system, not as a seam finish on their own. They are small, dense reinforcement stitches placed where the garment takes repeated pull, such as pocket corners and belt loops.
Once you can recognise those constructions, the placement on the garment starts making sense in a very practical way.
Where each seam belongs on a pair of jeans
The location matters because denim fails by pattern, not by accident. A seam that works beautifully on a waistband can be a poor choice on the inner thigh, and vice versa.
- Inseam - This is usually the hardest-working seam on the garment. A flat-felled finish keeps the raw edge enclosed and reduces irritation against the leg.
- Outseam - On traditional jeans, this may also be flat-felled; on many modern pairs it is a plain seam finished inside to reduce bulk and speed production.
- Crotch or rise seam - This area needs strength, but also flexibility. Heavy topstitching, careful grading, and reinforcement at the stress points matter more here than a flashy finish.
- Back yoke seam - The yoke controls fit and shape across the seat. A clean topstitched seam gives structure without adding unnecessary thickness.
- Waistband and pocket seams - These need to stay relatively thin so the top edge of the jeans does not feel stiff or bulky.
- Hem - The hem is where the iconic roping effect often appears, especially if it is chain stitched.
I find this part easy to overlook when people talk about seams in jeans as if they were all the same. They are not. Each seam lives in a different mechanical environment, and the garment shows it.
That is also why a repair only works when it respects the original seam logic, which leads straight into sewing choices at home.
How I would sew denim seams at home
If I were sewing denim from scratch, I would not start with decorative topstitching. I would start with seam allowance, needle choice, and bulk control, because those three things decide whether the seam lies flat or fights the machine.
- Use a generous seam allowance for felled seams. Around 1.5 cm (5/8 in) gives you room to trim one side, fold cleanly, and still keep the edge enclosed.
- Choose a denim or jeans needle. For midweight denim, 90/14 is usually a sensible starting point; for heavier cloth, 100/16 is safer.
- Lengthen the stitch. For visible topstitching, I normally test around 3 to 4 mm so the line reads clearly without looking cramped.
- Grade the layers before you fold. If three or four seam allowances meet at one point, trim one back so the intersection does not become a hard lump.
- Press at every stage. A seam that is stitched but not pressed properly will almost always look bulkier than it needs to.
- Test on scraps before committing. Denim varies more than people expect, even within the same weight.
If your machine struggles with thick thread, I would rather keep the construction thread standard and use a slightly heavier thread only where it is visible. That gives you strength without turning every seam into a fight.
When bulk becomes a problem, I would rather simplify the finish than force a machine through it. A faux flat-felled seam or a neatly overlocked seam can be the smarter choice for thicker denim, especially around the crotch and yoke.
Once you know how to sew the construction cleanly, the next question is not “what is strongest?” but “what is appropriate for this repair or alteration?”
Picking the right seam for repairs and alterations
For repairs, I try to match the original construction rather than impose a new one everywhere. That keeps the garment visually coherent and avoids creating odd pressure points.
| Repair or alteration | Best seam approach | Why I would choose it |
|---|---|---|
| Shortening the hem | Chain-stitched hem if you want the authentic look; otherwise a clean turn-up with a topstitched finish | The hem is visible, so the finish matters aesthetically as much as structurally. |
| Taking in the legs | Plain seam finished inside, then topstitched if the original pair was topstitched | It reduces bulk and keeps the alteration manageable on a home machine. |
| Crotch repair | Patch from the inside, reinforce with dense stitching and bartacks where needed | The area needs reinforcement more than a decorative seam rebuild. |
| Knee patch | Lapped or topstitched patch seam | Visible reinforcement works here, and extra fabric is less of a problem than on the rise. |
| Reconstructing vintage-style jeans | Flat-felled seams on the major leg seams | This gives the closest match to classic workwear construction and the most durable finish. |
The most common mistake I see in repairs is treating every seam as if it needs the same finish. It does not. A hem wants a different solution from a crotch blowout, and a leg taper wants a different solution from a patch across the knee.
That distinction matters even more when you want the finished pair to look intentional instead of visibly patched together.
The finishing details that make jeans look deliberate
The cleanest denim work is usually the least dramatic. When the stitch lines are even, the seam allowances are controlled, and the reinforcement is placed where the fabric actually strains, the whole garment looks more expensive even if the pattern is simple.
- Keep topstitching consistent so the visible lines stay parallel, especially on pocket edges and yokes.
- Use reinforcement sparingly but strategically. Bartacks and extra rows of stitching should support the design, not crowd it.
- Respect grain and stretch direction. If a seam is cut or sewn off grain, denim will twist after washing more than you expect.
- Do not overfinish low-stress areas. Extra stitching everywhere adds bulk without necessarily improving durability.
- Check the inside as well as the outside. A good denim seam usually looks deliberate on both sides, even if one side is less decorative.
That is the standard I use when I judge denim construction: the seam should handle wear, sit comfortably, and still look purposeful after repeated washing. When those three things line up, the garment feels like proper workwear rather than a compromise.
For denim sewing, the best results usually come from a small number of good decisions repeated consistently: choose the right seam finish for the stress point, manage the bulk, and press as carefully as you stitch. Do that, and the seams will do exactly what jeans are supposed to do.
