
A well-made turtleneck depends on three things: a neckline measured on the seam line, a collar with enough recovery, and a finish that stays smooth after wearing and washing. This guide shows how to sew a turtleneck collar for knit garments, from choosing the right fabric and drafting the band to attaching it cleanly and fixing the problems that usually show up at the neckline. I focus on the practical details that make the difference between a collar that sits comfortably and one that twists, ripples, or feels too tight.
The essentials before you start cutting
- Use ribbing or another knit with good recovery if you want the collar to stand up and spring back.
- Measure the neckline seam line, not the cut edge, before you draft the collar.
- For most knits, start with the collar length about 10-15% shorter than the neckline.
- Mark quarter points and centre back so the stretch is distributed evenly when you sew.
- Press lightly and test the collar over the head before you commit to topstitching.
Choose the collar style before you cut anything
I always decide on the collar shape first, because the right method depends on the fabric, the garment, and how close you want the neck to sit. A classic folded turtleneck needs a fabric with recovery, while a softer funnel neck or mock neck can work on lighter knits. If I am making a close-fitting winter top, ribbing is usually my first choice because it hugs the neck without fighting it.
| Collar style | Best for | What it gives you | Trade-off |
|---|---|---|---|
| Folded rib collar | Jersey, sweatshirting, brushed fleece | The most classic turtleneck look and the best recovery | Can feel bulky if the knit is too thick |
| Self-fabric funnel neck | Light to medium knits with decent stretch | A softer, cleaner look that matches the body fabric | Needs more careful measuring and stitching |
| Woven stand collar with opening | Shirts or dresses in woven fabric | A tailored, structured neckline | Not a true pull-on turtleneck and usually needs a closure |
For most pull-on garments, I treat ribbing as the safest starting point. It is forgiving enough to sit close to the throat without stretching out immediately, and it keeps its shape better than many self-fabric versions. Once that choice is clear, the drafting becomes much more predictable.
Draft the collar so the numbers work
Good collar drafting is mostly arithmetic, but the math only works if you measure the right line. Use the neckline seam line after the shoulder seams are sewn, or trace the seam line from the pattern piece if you are drafting before cutting. I usually start with the collar length at 85-90% of the neckline for a knit with decent recovery, then adjust after a quick test strip if the fabric is unusually soft or very elastic.
| Finished effect | Typical finished height | Good starting cut height with 1 cm seam allowance |
|---|---|---|
| Mock neck | 5-8 cm | 12-18 cm |
| Standard turtleneck | 10-15 cm | 22-32 cm |
| Deep fold-over collar | 15-18 cm | 32-38 cm |
- Measure the neckline seam line from centre back, around the front, and back to centre back.
- Decide the finished collar height before you cut. A mock neck is easier to wear under jackets; a taller fold-over collar gives more warmth and drama.
- Draft a rectangle with the collar length based on your neckline measurement and the height based on the finished look you want.
- Add seam allowance consistently, usually 1 cm or 3/8 in, unless your pattern uses a different allowance.
- Place the collar length so the greatest stretch runs around the neck, not vertically up and down.
- Make a test strip if the knit is slippery, very stretchy, or expensive. Ten minutes here can save a full unpick later.
One thing I check every time is whether the collar will still pass comfortably over the head once it is folded and sewn. A collar can look perfect flat on the table and still feel wrong in motion, so I prefer to test early rather than guess. With the piece drafted, the sewing itself is straightforward if you control the stretch at the right points.
Sew the collar and attach it cleanly
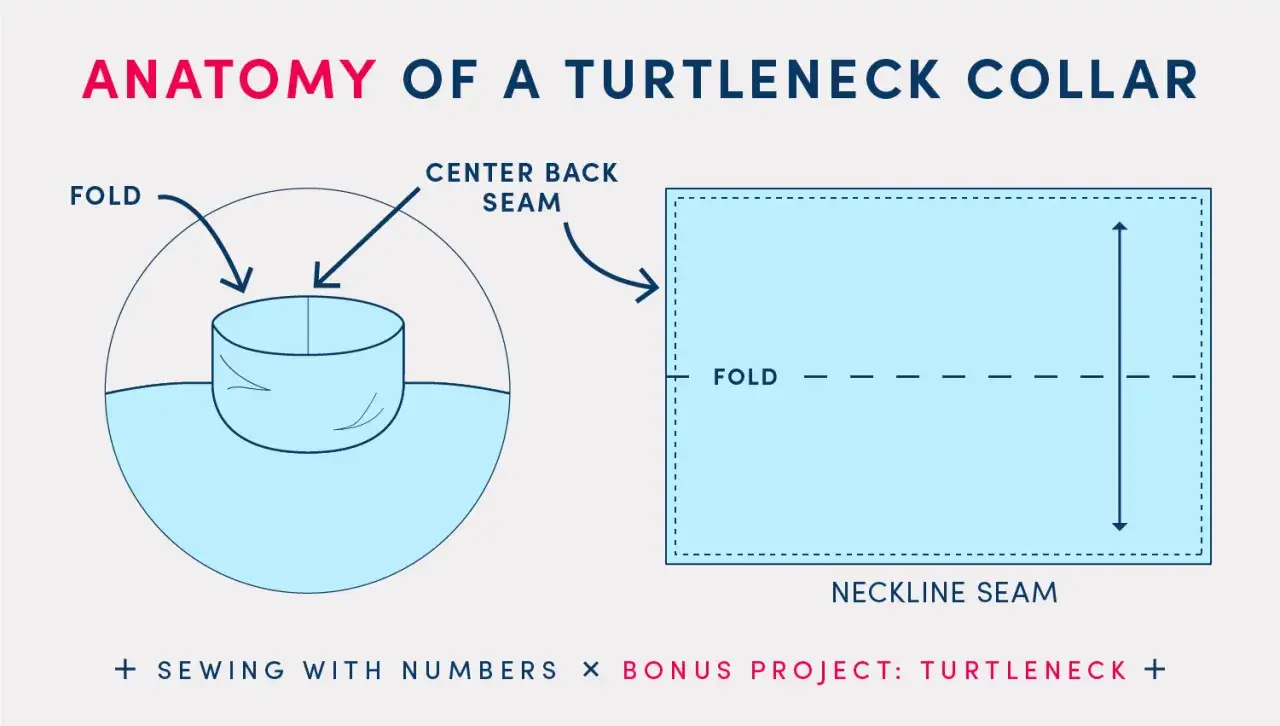
I sew the collar as a loop first, then attach that loop to the neckline with the seam allowances controlled all the way round. The key is to stretch the collar only, never the neckline itself. If the neckline grows while you sew, it will ripple later no matter how carefully you press it.
- Sew the short ends of the collar strip right sides together to form a tube.
- Press that seam open or to one side, depending on fabric thickness.
- Fold the tube wrong sides together so the raw edges meet and the fold becomes the top edge of the collar.
- Mark quarter points on the collar and the neckline, then match centre back first and work between the marks.
- Staystitch the neckline first if it is cut on the bias or made from a fabric that stretches easily.
- Attach the collar with an overlocker or a narrow zigzag or stretch stitch. A ballpoint or stretch needle in size 75/11 or 80/12 is usually a good starting point.
- Stretch only the collar as you sew, easing it to the neckline without pulling the body of the garment out of shape.
- Press the seam allowance down towards the body. If the knit is stable enough, topstitch 2-3 mm from the seam on the garment side for extra control.
If your overlocker has differential feed, which helps prevent stretching or rippling as the fabric moves through the machine, test it on scraps before sewing the real piece. I also like to keep the seam placement at centre back or one shoulder seam so the front of the collar stays visually clean. Once that is set, the finish is much easier to manage.
Finish the neckline so it lies flat after washing
The collar can be sewn correctly and still look disappointing if the finishing is too aggressive. Pressing matters, but so does restraint. I use steam lightly, support the curve over a tailor's ham if needed, and avoid flattening the fold so hard that the collar loses its shape.
| What you see | Likely cause | What I change |
|---|---|---|
| Wavy neckline | The body neckline was stretched while sewing | Staystitch first, then stretch only the collar as you attach it |
| Collar looks loose | The collar was cut too long or the knit lacks recovery | Shorten the collar slightly or switch to ribbing |
| Bulky seam at the neck | Too many layers are stacked at centre back or the shoulder seam | Grade seam allowances and press them apart where possible |
| Head opening feels tight | The collar is too short or the finished height is too ambitious | Reduce the height, add a little length, or build in an opening for woven fabric |
For a neater result, I sometimes grade the seam allowances so the collar seam does not create a hard ridge. On stable knits, a narrow line of topstitching can help the seam sit flat, but I would not use it blindly on very soft fabric because too much stitching can flatten the collar and make it lose life. The next challenge is recognising the mistakes before they become expensive.
The mistakes that make a turtleneck look homemade
Most bad turtlenecks fail for predictable reasons, and the good news is that they are easy to avoid once you know what to watch for.
- Measuring the wrong line. If you measure the cut edge instead of the seam line, the collar will come out the wrong size as soon as seam allowance is added.
- Using the wrong fabric. A knit with poor recovery may feel fine for a T-shirt but collapse quickly in a tall collar.
- Skipping the head check. The collar must still pass over the head comfortably after it is folded and sewn.
- Pulling both layers equally while sewing. Stretch only the collar. The neckline should stay stable.
- Pressing too hard. Heavy pressing can flatten the fold and remove the soft body that makes a turtleneck look finished.
- Ignoring the grain. If the collar length is not cut in the direction of greatest stretch, it can twist or bag out.
I also see people commit to the final seam before checking the fit around the face and chin. That is a small mistake with a big consequence, because a collar that is technically “right” but annoying to wear will not get used often. Once the common errors are clear, the last choice is how dramatic you want the neckline to feel.
Small style changes that make the result feel intentional
The difference between a plain neck and a polished turtleneck is often just a few centimetres of height or a slight shift in shape. I like to think of these as design choices rather than fixes, because they let the same base pattern do different jobs.
- Mock neck. A finished height of roughly 5-8 cm gives warmth without a full fold-over collar. I reach for this when I want the neckline to sit under a blazer or coat without crowding the face.
- Classic turtleneck. A taller collar, usually 10-15 cm, gives the traditional folded look. It works best with ribbing or another knit that springs back after stretching.
- Funnel neck. This is broader and less close-fitting, which makes it useful for sweatshirting, fleece, and relaxed tops. It is easier to wear, but it looks less crisp than a close ribbed neck.
- Woven stand collar. If the garment is woven, I usually add a closure or a back opening instead of forcing the fabric to behave like a knit. That keeps the collar comfortable and avoids stress at the neck.
If you are adapting an existing pattern, I think a mock neck is often the easiest first try because it gives you room to correct the fit without rebuilding the whole neckline. A full turtleneck looks simple, but the tall collar leaves very little forgiveness, so the first version should be slightly conservative rather than dramatic. That brings me to the last check I make before I call the collar finished.
The last checks I make before calling the collar finished
- The collar springs back after a gentle stretch instead of staying baggy.
- The seam sits where I planned it, usually at centre back or one shoulder.
- The garment passes over the head without tugging at the neckline.
- The fold stays even after a light steam press and a short cool-down.
- The neckline looks smooth from both the outside and the inside.
If those five checks pass, the collar is doing its job. My rule is simple: make the neck look a touch softer in the flat than you think you need, because the body always gives it more shape once it is worn. That small bit of restraint is usually what separates a handmade turtleneck from one that feels professionally cut.
