
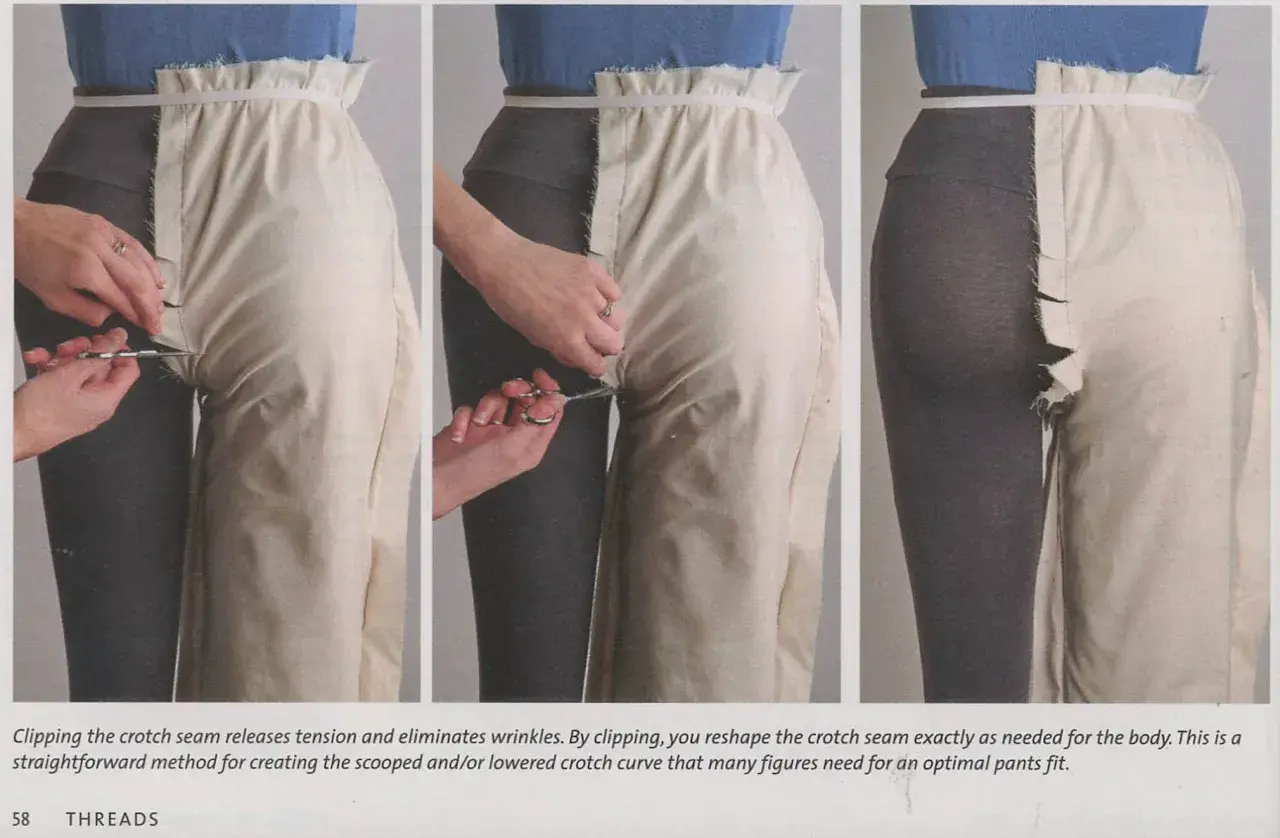
The crotch seam is the junction that joins the front and back leg pieces in trousers or shorts, and it has an outsized effect on fit, comfort and durability. Get it right and the garment moves cleanly; get it wrong and you see pulling, sagging, rubbing or a shape that never quite settles. Here I’m looking at what that seam does, how to read the fit clues it leaves behind, and how to correct it before a pair of trousers or jeans becomes awkward to wear.
The points that matter most before you cut or alter trousers
- This seam shapes the rise, the seat and the way the legs hang.
- Small changes usually work better than big ones, especially around the front and rear curves.
- Wrinkles, drag lines and waistband pull all point to different fixes.
- Jeans usually need a tougher finish than tailored trousers because the area carries more stress.
- A toile is the fastest way to find out whether you need to add, remove or redistribute room.
What this seam actually does in trousers and shorts
In practical terms, this is the point where the garment stops being two flat leg pieces and starts becoming a shape that has to follow a human body. It controls how much room there is through the seat, how high or low the trousers sit, and how freely you can sit, step and bend.
I treat it as a structural seam, not just a construction line. If the front rise is too short, the fabric pulls upward and feels strained. If the back is too shallow, the trousers can cut into the seat or drag down at the waist. Shorts show those problems even faster, because there is less leg length to distract the eye.
Many commercial home-sewing patterns use a 1.5 cm (5/8 in) seam allowance in this area unless the instructions say otherwise. That gives you enough room to sew accurately and, if needed, make a small fitting change later. Once you understand that this line carries both fit and stress, the next step is learning how to read the clues it leaves on the fabric.
Once you see it as a structural junction rather than a simple join, the fitting clues start to make much more sense.
How I read fit problems before changing the pattern
The easiest mistake is to blame every wrinkle on the same issue. I don’t start there. I look at the direction of the drag lines, where the fabric is biting, and whether the problem appears in the front, the back or the whole hip.
| What you see | What it often means | First change I try |
|---|---|---|
| Horizontal wrinkles across the front seat | The front rise may be too short, or the hip may be too snug | Check hip ease first, then add a little length to the front curve |
| Vertical lines pulling up from the front seat | The front curve may be too deep or too tight over the pubic area | Scoop the front curve slightly, in a small step |
| Loose folds or bagging under the seat | The back may be too long or too roomy for the body | Reduce the rear rise or shorten the back curve a little |
| Waistband pulling down at the back | Not enough room through the seat | Add room to the rear curve before touching the hem |
| Wrinkles across the whole hip and thigh | The issue may be width, not just the curve | Let out the side seams or revisit sizing before altering the rise |
The key point is this: a visible wrinkle is a symptom, not the diagnosis. I always check the whole hip and seat before trimming or redrawing anything, because a few extra millimetres in the wrong place can make a good fit worse. Once the fit clue is clear, the sewing and finishing choices become much easier to judge.
How I sew it cleanly for jeans and woven trousers
The construction method depends on the fabric and the end use. Denim and workwear usually benefit from a flat-felled finish because it is strong, neat and comfortable against the body. Tailored woven trousers are often overlocked or zigzagged and then pressed open, which keeps bulk down and gives a cleaner drape.
- Join the leg pieces according to the pattern order, and keep the stitch line smooth through the curve.
- Use the pattern’s seam allowance rather than guessing; if you need to fit later, that extra margin is valuable.
- Press each seam as you sew. Curved seams respond better when heat and steam are applied in stages.
- Clip or notch the seam allowance only where the fabric needs help to lie flat. Too much clipping weakens a high-stress area.
- Topstitch only after the shape sits correctly. On denim, that topstitching is part of the structure as well as the look.
I’m cautious with bulky denim here: the more layers you force into the curve, the harder it is to get a smooth finish. If the fabric is heavy or the pattern is very curved, a simpler finish can look better than an overbuilt one.
If the seam is sewn well but still feels wrong on the body, the fix usually sits in the pattern rather than the machine.
The adjustments that usually solve the problem
Most fitting changes around the seat work best in very small steps. I usually start with 3 mm to 6 mm (1/8 to 1/4 in) changes, then test again. Bigger moves can be right, but they are easier to overshoot.
| Fit issue | What I usually change | Good starting amount | Watch out for |
|---|---|---|---|
| The front feels tight when standing or sitting | Add length to the front curve | 3 mm to 6 mm | Do not chase the issue by lowering the hem |
| The front looks baggy or droops slightly | Remove a little length from the front curve | 3 mm to 6 mm | Check that the hip is not simply too large |
| The back waistband dips down | Add room to the rear curve | 10 mm to 15 mm | Keep the change balanced with the side seam |
| The back seat looks saggy | Reduce excess at the rear curve | About 10 mm | A little goes a long way on a shorter back rise |
| The trousers are fine until I sit down | Check both rise length and thigh ease | Start with the seat, then the thigh | Stretch fabric may hide the issue, but it will not solve it |
I never use hem length as a shortcut for a rise problem. If the body needs more room in the seat, cutting the legs shorter just hides the symptom and usually makes the balance worse. That is why I prefer to alter the pattern, test it, and only then commit to the final cut.
Next, the fabric and garment style decide how far you can push those changes before the result starts to look heavy or fussy.
How the garment type changes the answer
The fitting logic is similar across jeans, tailored trousers and shorts, but the finish changes the feel completely. I think about durability, bulk and how obvious any flaw will be once the garment is worn in the real world.
| Garment type | What I pay attention to | Practical note |
|---|---|---|
| Jeans | Strength, topstitching and bulk control | Flat-felled seams are common because they hold up to wear and repeated washing |
| Tailored trousers | Clean drape and reduced bulk | Pressed-open or neatly overlocked seams usually sit better than heavy finishes |
| Shorts | Seat balance and comfort when sitting | Small rise mistakes show fast because there is less leg length to disguise them |
| Stretch denim or stretch woven fabric | Negative ease and recovery | The fabric forgives more, but it does not replace the need for a balanced rise |
I see people assume stretch automatically solves a bad fit. It doesn’t. It only gives you a little more tolerance, which can be useful, but the body still needs the right shape underneath. A well-drafted rise will always look calmer than a stretchy one that is fighting the body.
Once you know the garment type, the last question is whether the pattern is ready to cut at all, or whether it still needs a few checks first.
The pre-cut checks I would not skip
Before I cut into good fabric, I run through a short list. It saves more fabric, time and frustration than any clever repair later.
- Compare the rise against a favourite pair that already fits well.
- Check the front and rear curves separately, not just the total waist measurement.
- Confirm the seam allowance on the pattern and keep it consistent through the curve.
- Make a toile in a fabric with a similar drape and stretch level if possible.
- Mark the grainline, notches and stitch line clearly before sewing.
- Decide on the seam finish first, especially if you want a denim-style flat-felled finish.
When I true the legs, I want the lower leg lengths to match neatly and I only accept a small difference near the curve itself. If the mismatch grows beyond about 1/2 in (1.3 cm), I stop forcing it and redraw the pattern instead. That is usually the point where the garment needs a proper adjustment, not more confidence with the scissors.
The quickest route to a better result is usually the boring one: compare a favourite pair, change one dimension at a time, and test again in fabric that behaves like the final garment. Once the rise and seat are balanced, the rest of the trousers suddenly look more intentional, and the seam stops drawing attention for the wrong reasons.
